Friday 19 December 2014

DIY TARDIS Christmas Ornaments

Hello!

Today I reveal the fact that I'm a bit of a geek.  One of my favourite shows is Doctor Who and I couldn't resist making some TARDIS ornaments to give to my friend for Christmas (who is the person who got me hooked on the show).  These are not easy to make and they take a really long time as well.  But I think they are so worth it!


Materials:

  • TARDIS blue light-weight card, white (or in my case really, really light purple) and black card
  • Light-weight cardboard (cereal boxes are good) and thick cardboard 
  • 1 x 1 cm square punch (trust me you will want one)
  • Light blue Sharpie
  • Fine tip black pen
  • Sliver gel pen
  • Sliver wire

First I made a box based off of this tutorial from the lightweight cardboard to form a sturdy base.  I glued mine completely shut as I didn't want the box to open.  I then cut a piece of the blue paper to the same size needed to make the box and wrapped it around the cardboard.  Before I adhered the paper to the box I used my scissors to cut the tabs so that they could fold nicely over the top and bottom.  Kinda like what you do when you make the box but I was being lazy so just used the folds created when I wrapped it around the box as my guide.  If you have paper that isn't coloured all the way through (it has a white core) like mine did then use the light blue sharpie to carefully colour the edges blue.

From a spare piece of the blue paper I created two templates for the doors to trace around.  I needed two templates because all the sides aren't equal.  With the blue sharpie I traced around the outside of these templates onto all four of the sides of the Tardis and added a line down the middle of each resulting box.  I suggest doing this before you adhere the paper to the box also.  Then I wrapped the box and adhered down all the tabs.


For the two sides and the back of the Tardis, I punched two white squares and four blue squares, and for the front, three white and three blue.  On all but one of the white squares I drew on with a fine tip black pen the window panes.  The last white square has some (not all) of the writing from the sign.  For all of the blue squares I used the blue sharpie to colour the white core around the edges.  The 'Police Public Call Box' Sign is 0.5cm wide and 3cm long for the front and back and 2.7cm long for the sides.  I used the silver gel pen to write on these strips before adhering them to the box along with all the squares using double sided tape.

The top and bottom pieces are made from pieces of cardboard covered with the blue paper.  The smallest piece is 2.5cm x 2.5cm and the two bigger pieces are 3.8cm x 3.5cm.  One of the larger squares is adhered to the bottom of the tardis with a strong liquid glue.  Before I added the two top pieces I used a needle to create a hole through the center of both of them to add a loop of wire.  The wire is secured under the bottom piece with tape and adhesive is also under the top piece so it doesn't move around.

As I was giving these cute little TARDIS ornaments as a gift to my friend for Christmas, I created this box using this tutorial.


Materials:
  • TARDIS blue light-weight card, white light-weight card
  • Dark blue ink (Archival Cobalt)
  • Star background stamp (Hero Arts Tiny Star Background)
  • Paper bow made from silver paper

As I said at the start, these are time consuming (and unfortunately cannot travel through time and space).  These three took me around two hours to make but my friend loved them!

This is the end of my Christmas-ness for this year and for the blog too.  I will be back in the first week of January with a birthday card.

Till next time,
Stacey

Wednesday 17 December 2014

Glitter Paper Inlay Christmas Card

Hello!

This will be my final Christmas Card this year seeing as it is only a little over a week till Christmas now!  At this point in my Christmas card making I'm a bit over it so I wanted something that didn't take a lot thought or effort to make.  I'm happy with how this card turned out other than the gold pen, not so sure about the colour.

Materials used:

  • A white card base (which was a little longer at 15cm rather than 14.85cm) and a piece of white paper slightly smaller than the card front
  • Flower and swirl die (Couture Creations)
  • Red, green and gold glitter paper
  • 'With love at Christmas' sentiment stamp
  • Red ink (Archival, Vermilion)
  • Red gems
  • Gold metallic pen

I began by die cutting the flower out of the card base, then fully out of the green glitter paper, and partly out of the red and gold glitter papers.  
On the piece of white paper, I covered most of it with double sided tape and carefully adhered it behind the front of the card so that there is adhesive is visible through the negative of the die cut.  I then placed the green glitter paper die cut into the gap and the pieces of white card from the first die cut.  I trimmed the red glitter paper die cut so that only the flower remained and used a strong adhesive to glue it over the green glitter paper.  Then I added the gold circle to the center of the flower.
I created a border for the card with a ruler and the gold pen and added the sentiment to the bottom left corner.
For the finishing touch I added a line of gems either side of the flower.

See you tomorrow!
Stacey

P.S. This card has been added to the Simon Says Stamp Wednesday Challenge - Bling it on.

Tuesday 16 December 2014

Simple Christmas Gift Tags

Hello

Today I have some simple gift tags to show you.  When it comes to making gift tags you really want something that isn't complicated and can be put together fast.

Materials used:

  • White card
  • Tag shaped die (Cuttlebug)
  • Green and red striped patterned paper (Rosie's Studio)
  • Red dye ink (Archival Vermilion)
  • A 'To', 'From' and 'Merry Christmas' stamps
  • White thread
  • Buttons
First I cut the tag using the die, the die I used was longer than I wanted so I just trimmed the paper down before I die cut it.  I then arranged the stamps in the layout I wanted on top of one of the tags then picked them up at the same time with my block so I could stamp them all at the same time and keep the same spacing for all my tags.


After stamping the tags I cut 2cm wide strips from my patterned paper and applied adhesive to the back.  Using my grid mat for reference I adhered the paper to one of the tags and used my scissors to trim off the over hang which I then used on the next tag and so on.  I threaded some of the white thread through the button and placed a piece of double sided tape to the back and adhered it in the middle of the patterned paper.  Turning the tag over I taped down the thread to fully secure the button.  To finish the tag I added a length of the white thread through the hole at the top.

This tag is great for mass producing as there is only a few different elements and each one is simple to execute.  

See you tomorrow!
Stacey

Monday 15 December 2014

Paper Poinsettias

Hello

Today I bring you the first of my ornaments.  These are simple poinsettias, made from several identical pieces.

Materials used:

  • Red and green paper
  • Gold shimmer spray
  • Leaf stamp
  • Red and light blue (because I didn't have green) archival ink
  • A pin
  • String
I began by spraying both the red and green papers with my homemade shimmer spray (gold metallic paint with water in a spray bottle) and leaving it to dry.  Once the paper was dry I stamped seven leaves in red ink onto the red paper and three leaves in light blue ink onto the green paper.  I then cut them all out with scissors.

Line up all the red leaves together in one stack and push the pin through all of them at the bottom of the leaf.  This is so you can use the pin as an anchor for the leaves while you rotate them to find a placement you like.  Once I had the leaves arranged to my satisfaction I flipped the flower over and used tape to secure them.  I then removed the pin and added a small amount of liquid glue under the top three leaves.

Following the formation of the flower I then added the three green leaves behind the flower using tape to secure them.  Using liquid glue I added gems to the front for the center of the flowers.  Finally a simple loop of string attached to the back with tape allows the ornament to hang.

Other options:
I made another poinsettia out of gold paper and used gold embossing powder instead of just stamping the leaves.  I never quite got round to making the three leaves for this flower but had thought of making them from vellum with the gold embossing powder.

I really like how these turned out, The hardest part was cutting out all the leaves, though I imagine if you had matching dies for a particular stamp you could die cut them instead of fussy cutting them.

See you tomorrow!
Stacey

Friday 12 December 2014

Happy Christmas Card

Hello

This will be my final Christmas card for this week.  Next week will be papercraft decorations for Christmas and my final Christmas card for 2014.  Today's card features my favourite colour because I just can't resist.

Materials used:

  • White card base
  • A purple and a gold shimmer paper
  • Star background stamp (Hero Arts Tiny Stars Background)
  • Versamark ink
  • Clear embossing powder (Ranger)
  • Purple ribbon
  • 'Happy Christmas' die
First of all I created the background by stamping and embossing the star background stamp onto a piece of purple paper.  I adhered it flat to the card base.  From another piece of the purple paper I die cut the sentiment which I then covered with a layer of the embossing.
I adhered the sentiment on to the gold shimmer paper and created a banner end.  I wrapped a piece of the ribbon around the top and then adhered it to the card with foam tape.
For the final touch I created a bow from the ribbon and adhered it over the ribbon on the card.

This card didn't take very long to make but it still has high impact.  But maybe I'm biased towards the colour purple!

See you next week!
Stacey

Thursday 11 December 2014

Christmas Lights Card

Hello!

Today is the fourth day of my Christmas Card week and I've got a bright and cheerful one to show you today!

Materials used:

  • White card base and black card
  • Gold foil paper
  • Christmas light stamp (Fiskars)
  • Merry Christmas tree shaped sentiment stamp (Sullivans)
  • Red, green, yellow and blue ink
  • Versamark ink
  • Gold embossing powder (Ranger)
  • Nesting circle dies (Couture Creations)
  • Paper bow template
  • Red, green, orange and blue glitter glue
The first thing I did was to trace lightly around the circle onto my card base so I could stamp my lights in something that closely resembled a circle (which wouldn't have happened if I tried to do it by eye). 

I had previously stamped out the lights on to some scrap paper in black so I could figure out which lights to stamp in each colour.  Thankfully it worked out really well in that there would be 8 lights in each colour so the pattern was easy to create.  There is a small amount of overlap on some of the lights because even with the pencil mark my stamping was a little off but its not highly noticeable.

Once the lights were done I left them to dry before I erased the pencil.  I then stamped and embossed my sentiment onto the circle which I adhered using foam tape.

I then looked at my card and thought the bottom half looked empty so I created a paper bow using a template to trace and cut out the different pieces of the bow.  I didn't want the bow to just float so I anchored it by placing a strip of the gold paper underneath.

The final step was to put the glitter glue over the lights which gave them a pretty sparkle and the effect that they were 'glowing'.

That is all for today's card, come back tomorrow for another!
Stacey

P.S. This card has been added to the Simon Says Stamp 'Bling it On' Challenge.

Wednesday 10 December 2014

Whimsical Christmas Card

Hello

Today's card is the third in my week of Christmas Cards.  It is a fairly simple card that uses a dry embossed background and a homemade patterned paper to draw attention to the sentiment.

Materials used:

  • White and Navy card
  • Christmas themed embossing folder (Couture Creations)
  • Distress ink in salty ocean, peacock feathers and antique linen
  • Sliver pearlised spray
  • Peace on Earth sentiment stamp
  • Versamark ink
  • Sliver embossing powder (Ranger)
  • Swirl stamp
  • Blue and sliver gems

I began by creating the embossed background using the white card and the embossing folder and I trimmed the piece down to the edge of the embossing.

Next I created the blue handmade patterned paper.  I started by using a clean brush to wet the piece of card with the pearlised water and then picked up the colours and dotted them around allowing them to mix and blend together.  To get the intensity I wanted I added a few layers of colour.  Once the piece was dry I stamped the swirl stamp several times using the salty ocean distress ink.  I then trimmed the piece down and created a banner end.
I stamped and embossed the sentiment on to a piece of navy card then trimmed it to size.  I adhered the embossed background and the blue swirl piece flat while the sentiment was adhered using foam tape.  For a final touch I added the gems.

If you were wanting to make several cards like this then creating a large sheet of the patterned paper would be the best way to do it.

See you tomorrow!
Stacey

PS. this card has been added to the Christmas/holiday challenge at Simon Says Stamp Wednesday Challenge Blog.

Tuesday 9 December 2014

Modern Christmas Card

Hello!

Welcome back, today is the second day in my week of Christmas Cards.  Today's card is in a more modern style but with traditional Christmas colours.

Materials used:

  • Red and green patterned paper (Rosie's Studio)
  • White with silver foil paper
  • A wreath die cut and a joy die cut (Rosie's Studio)
  • Red glitter glue


This card is really very simple and mass producing it will be easy.  I started by creating a curved edge on the silver foil paper but ultimately most of it is covered so it's not really required that it has a curve.  I then cut out a few circles in different sizes from the patterned paper.  After deciding upon the layout I adhered all the pieces to the card using foam tape behind the top green circle, the wreath and the sentiment.  Finally I added some glitter glue to the wreath.

I love how easy this card is and how well it turned out.  Even if you don't have the pre-made die cut images making a wreath isn't very hard.

Come back tomorrow for another Christmas Card!
Stacey

PS. This card has been added to the Christmas/Holiday Card Challenge at Simon Says Stamp Wednesday Challenge.

Monday 8 December 2014

Hanging Ornaments Christmas Cards

Hello,

Christmas is fast approaching so this week I will be posting a new Christmas card everyday for the next five days.  Next week I'm planing on posting some decorations alongside my final Christmas card for the year.

Today I've got a Christmas card that has three hanging ornaments.  I've made two versions, one with the ornaments embossed in gold and the other simply stamped in black.

Materials used:

  • White card bases (Trophee, 240gsm, white linen)
  • Red, green, white, pink and two shades of purple, subtle patterned paper and a pale yellow paper
  • Gold embossing powder (Ranger)
  • Versamark ink, Stazon black ink, gold (MSC) and purple ink (Rosie's studio)
  • Ornaments stamps, star cluster stamp and 'Deck the Halls' sentiment stamp
  • Gold and silver string
  • Silver gel pen

I began by stamping my ornaments on to the various patterned papers and cut them out with scissors.  For the background panel I stamped the stars across the pale yellow paper after I trimmed it to the right size.  I then cut two strips from one of the papers used for the ornaments and adhered them and the star piece to the card front.


To add some sparkle to the ornaments that were stamped in black I used a silver gel pen to add some detail.  Before I added the ornaments I created a hole at the top of each of them for the thread to loop through.  The ornament with the sentiment was adhered with dimensional foam tape while the other two were adhered flat.

That's it for today's post, see you tomorrow for another Christmas card!
Stacey

Saturday 22 November 2014

Joy to the World Christmas Cards

Hello,

Today I have two cards which use the sentiment as the main focus with an embossed vellum overlay for interest.  I've always been a fan of Christmas cards that aren't too in-your-face Christmas-y and these certainly fit that description.

Materials used:

  • Blue and red card bases
  • Vellum, black and white card
  • Silver and gold embossing powders (Ranger)
  • Versamark ink
  • Various snowflake stamps
  • 'Joy to the World' sentiment stamp (Teresa Collins)
  • Silver and gold gel pens


For the vellum piece, I used the edge of a stencil to trace the scallop shape along one side with a pencil. Flipping the piece over I began to stamp the snowflakes starting with the largest and progressing to the smallest.  After each stamp I applied the embossing powder so I could see where I had stamped so I wouldn't accidentally overlap any.  Once I had heat set the powder I turned the piece over again and used scissors to cut along the scalloped line and used an eraser to take away any left over pencil marks.
The sentiment was stamped and embossed on a tag shaped which I got by tracing a die cut and trimming out with scissors.  Using the black gel pen I created a dash line border around the sentiment.  For contrast I used a 2cm wide strip of black paper with dash lines along each edge.

The stamping of the snowflakes did take a while but if mass production is your aim then stamping a larger sheet of vellum and embossing before cutting it down would be your best option.  I quite like the simple nature of this card, all the focus is directed to the sentiment and then you notice the pretty snowflakes in the background.

Til next time
Stacey

Saturday 15 November 2014

Trio of Christmas Trees Card

Hello,

I decided to do something I've never done before this week, I used Kraft coloured card.  Not being a big fan of Kraft meant that I actually don't own any so I had to go out and buy some, and I eventually settled on pre-made square card bases with matching envelopes.  This particular card is really quite simple and will be easy to mass produce.

Materials used:

  • Kraft card base (Creativ)
  • Four shades of green patterned paper and a star patterned paper
  • Christmas tree die (Couture Creations)
  • Gold embossing powder (Ranger)
  • Versamark ink
  • 'Merry Christmas' sentiment die cut

I began by using the die as a template for the trees, cutting out triangles from three of the four green patterned papers.  The fourth green paper was cut with the die.  I used the die cut to draw a star on to some white card and embossed the opposite side before trimming out the shape with my scissors.  I used the embossing powder also on the ornaments of the die cut.  Then I adhered the die cut and the star to one of the trees.

Once I had all the pieces made I could adhere them all to the card.  The background paper and the two non-decorated trees are adhered with double sided tape while the decorated tree, star and sentiment are adhered with dimensional foam tape.

As I said earlier this card would be easy to mass produce as there is no stamping involved (unless you decide to stamp the sentiment rather than using a pre-made one) and all that is required is some basic cutting and die cutting.

Till next time,
Stacey

This card has been submitted into the Simon Says Stamp Wednesday Challenge - 'We're seeing stars'.
http://www.simonsaysstampblog.com/wednesdaychallenge/

Friday 7 November 2014

Die-cut inlay Christmas Cards

Hello,

So I've been neglectful again, my bad.  I'm still working out a new lifestyle and this blog has really slipped down the list of priorities.  Anyway, I'm back now and hopefully *fingers crossed* I keep it up this time.

It is now November so it's time for Christmas again.  This year I've started off the festivities with a set of sparkly die-cut inlay cards.  Initially I created two water colour background pieces for two cards but ended up making four cards.
The first card with a complete die-cut inlay
Materials used:
  • Card bases, two white A2 sized, one purple and one white 10.5cm x 10.5cm.
  • White linen 240gsm card (Trophee), pearlised paper (Creativ), sliver and white glitter paper.
  • Distress mini ink pads in seedless preserves, salty ocean and picked raspberry.
  • Pearl-ex powder.
  • Silver embossing powder (Ranger) and embossing ink (Versamark).
  • 'Merry Christmas' stamp.
  • Snowflake die (Couture Creations).
  • A selection of self-adhesive pearls and gems.
The second card with a partial die-cut inlay
I began by making the two background pieces with the distress ink, water and pearl-ex powder.  Once they were dry I ran them through my Cuttlebug with the snowflake die reserving all the small pieces that were cut out.  Both the smaller 10.5cm x 10.5cm cards have the water coloured die-cut snowflakes while the two bigger cards have glitter paper die cuts.
The fist smaller card
The partial die-cut inlay card has just the glitter die-cut inlaid with pearlised paper behind the top half, while the fully inlaid card also has the small pieces from inside the snowflake adhered back into place (though two pieces have annoyingly fallen out somehow).  The sentiments on both of these cards were embossed in silver and gems were added to both the snowflakes.
The second of the smaller cards
For the two smaller square cards, only the water coloured die-cuts with gems/pearls are on the front.  For the first card I added more of the distress inks + water to the card base so when I layered the pearlised paper over it there was a border that matched the snowflake.  The second card has a purple card base as the snowflake is mostly purple in colour.

These cards are likely to be the most 'wintery' Christmas cards I will make, as it is summer at Christmas here in NZ.  I tend to make cards that reflect that or don't suggest any particular season.  I just have a strong connection between summer and Christmas (don't hate me, it's just super unlikely that it will be cold here in December).

Till next time,
Stacey


Friday 26 September 2014

Mixed Media 1 - Music is the voice of the soul

Hello

To begin I must apologize for being so absent over the past month and a half.  Many things happened to me during this time and as a consequence my life has changed a bit.  My crafting took a bit of a hit as well as inspiration was lacking and there were other things to be dealt with.  Today however, I have something different to share.  I've been steadily gaining interest in mixed media projects and have created one of my own during the last couple of weeks.

Music is the voice of the soul

I'm not going to list all the products I've used because a lot of it was just pulled out of my stash or made.  The gold embossed notes (Ranger Queen's Gold embossing powder) and glittered hearts were chipboard pieces that came from a card magazine I got ages ago and altered for the project.  I used sticky embossing powder (Ranger) to hold the glitter (American Crafts Taffy) on and a layer of clear embossing powder (Ranger) over the top to make sure the glitter couldn't escape.  The violin was also part of the set as a 2D chipboard piece, but I created a back for it and joined it together with a strip of paper to make it 3D along with adding the strings using gold thread and two pieces of dimensional foam tape.

Close up of the violin

I made the majority of the flowers using dies to cut out the flower shapes (Couture Creations Daisy Nesting Dies) and adhering them together with hot glue.  The carnation looking flowers were created from circles that I sprayed with water, crinkled up, left to dry, then stacked them together and pushed a brad through to hold them in place and fluffed up the petals.

The bottom right corner where most of the flowers are.

I used a couple of my flourish type dies (Couture Creations) to create some greenery for the flowers and the gold embossed decal at the bottom by gluing several of the die cuts together and embossing it.  I've added a few gems and pearls to the flower centers and dotted around the place to add a bit of bling.  My distress inks (Mowed Lawn, Picked Raspberry, Antique Linen, Walnut Stain, Vintage Photo, Seedless Preserves) got a bit of a workout during this project, they were used to age the edges of the main background, add stenciled images (Rosie's Studio) on the background.  They were also used to define the edges of the flowers and to colour and stencil (Memory Box) the violin.  I used some pearlised paint and pearl-ex powders (Interference Gold, Interference Violet) mixed with water to provide shimmer on some of the flowers and areas on the background.

Bottom left corner; featuring a glittered heart and a faux metal embellishment.

There are also a couple of paper doilies that I coloured with distress ink and some die cut borders from a magazine gift that I used along with a couple of pre-made flowers.  I did do a small amoun of stamping on the background with a dotty stamp and a swirl stamp using the Picked Raspberry distress ink and Stazon Jet Black ink.  Finally the sentiment was added with some black alphabet stickers.

I hope you like it, this is my second attempt at a mixed media project and I'm really happy with how it turned out.  I learnt quite a few things while I was creating this and have many things to work on for my next attempt such as preventing warping.  I'm going to add this to the Simon Says Stamp Wednesday Challenge Blog, go check it out.  This weeks challenge is "Anything Goes".

Till next time,
Stacey.

Saturday 16 August 2014

Floral One Layer Card

Hello,

This week I'm featuring a one layer card.  I don't often make one layer cards as I do find it difficult to use the space with just stamps.  This one was actually easy to create with a bit of masking and some pretty stamps.

Materials:

  • White card base
  • Flower (MME), leaves (Couture Creations) and 'thinking of you' (Cre8tiv) stamps
  • Plum (Ranger archival), black (Stazon) and green ink as well as mowed lawn and seedless preserves distress ink
  • Black marker pen
  • Pearls and gems
  • Corner rounder (Fiskars)
Directions:
  1. Mask off an area just below the middle of the card front.  Stamp two of the largest flowers either side of the masked area making sure to overlap the mask a bit.  Stamp one of the smaller flowers below the mask.  Mask off the flowers and stamp the leaf outlines to fill in more space.
  2. Remove the mask.  Using a ruler and the marker, create two lines either side of the masked off area.  Stamp the greeting in between the two lines.
  3. Using the distress ink, water and a brush, fill in the leaves and any outline flowers with colour.  Once dry, splatter some of the purple distress ink over the card front.
  4. Adhere a few gems and pearls and round the top right corner.
I was kind of making this one up as I went with no final vision in mind, I think it turned out well and I managed to hide the small mistakes I made well.  The splatter of ink was to help hide the fact that some of the ink from when I stamped the flowers seeped through the mask and the gems were to cover up a couple of smudges I made.  Just goes to show that little mistakes like that can be covered up and disguised easily to save your card from the rubbish bin!

Till next time
Stacey

Saturday 9 August 2014

Hap-pea Birthday card

Hello

Today's card is a fun one that contains a pun in the sentiment.  I don't often make funny cards so it was nice to change things up a bit.

Materials:

  • Green card base, white (Trophee, 240gsm, white linen) and black (Trophee, 210gsm, black) card, green paper
  • Pea stamp (Fiskars), alphabet stamps (Cre8tiv) and 'birthday' (Sullivans) stamp
  • Green ink and black (Stazon) permanent ink
  • Green pen and a green and black gel pen
Directions:
  1. Stamp over the card front the pea image several times in green ink.  Stamp the pea image again in black on to the white card.  Stamp out the sentiment using the alphabet stamps and 'birthday' sentiment, use green ink for 'pea' and black for everything else.
  2. Colour in the pea image with the pens.  Use the black gel pen to draw a smiling face on one of the peas.
  3. Matt the white card with the green paper and then black card.  Adhere to the card base.
I love how this card turned out, I'm going to have to make some more funny cards in the future because this one was so much fun to make and it brings a smile to people's face when the see it.

Till next time
Stacey

Friday 1 August 2014

Spotlight on Patterned Paper: Elegant Friendship Card

Hello,

Today's card is the final in the patterned paper series.  It is a very simple card and is quick to make so would be easily mass produced.

Materials:

  • White card base, black polka dotted paper, green paper and white card
  • Friendship stamp (Kaisercraft)
  • Black ink (Stazon)
  • Black gel pen
  • Black embroidery floss
  • Green sparkly thread
Directions:
  1. Trim the polka dot paper to fit your card front.  Cut a strip of white card large enough to fit your stamp and a bow at the bottom.  Cut a piece of green paper to create a small border for the white piece.
  2. Stamp the sentiment on to the white piece.  Using the gel pen create a dash line border around the edge.  Tie a bow with the green and black threads together underneath the sentiment.  Adhere the piece on to the green paper and the panel onto the card front.
See told you it was simple.  Yet it looks good doesn't it?  That is the beauty of patterned paper, it can be used to cut down on the time it takes to create but you still get amazing looking cards!  Prepare yourself for a whole bunch of birthday cards over the next month, I have many friends and family with birthday's in August and I need to make them all a card!

Til next time.
Stacey

P.S. This card has been added to the Simon Says Stamp Wednesday Challenge.  Check it out at http://www.simonsaysstampblog.com/wednesdaychallenge/

Monday 28 July 2014

Embossed Stenciled Card

Hello!

Yes a post on Monday! I'm hoping to make this a regular thing by using Monday's to post up my entry to the Simon Says Stamp Wednesday Challenge Blog instead of trying to fit my usual cards into the theme.  So this weeks challenge on the blog is to create a card that features embossing, including dry, wet and embossing paste.  I love embossing so I had fun with this one.

Embossed Stenciled card
Materials:
  • Black card (Kasdak, 210gsm, Raven Black), maroon card (Rosie's studio)
  • Stencil (Memory Box, Raymelle)
  • Embossing ink (Versamark)
  • Gold Embossing powder (Ranger, Queen's Gold)
  • "Happy Birthday" stamp (Couture Creations)
  • Nesting flower dies (Couture Creations, Daisy)
  • Flourish die 
  • Yellow/Gold gem
Directions:
  1. Create a top folding card base from the black card.  Cut from the black card; one flourish, one of the smallest flower die and two of the next size up flower die.
  2. Place the stencil over the maroon card and secure it with some low-tack tape.  Squish your embossing ink pad over the top of the stencil until the paper underneath becomes completely covered.  Carefully remove the stencil and apply the embossing powder over the card.  Heat set and trim around the edge of the image.
  3. Stamp and emboss the "Happy Birthday" sentiment vertically along the left side of the card.  Using this as a guide, trim down the maroon piece to fit.  Adhere it on to the card with dimensional foam.
  4. To make the flower, gently curl the petals of one of the larger flowers.  Taking the other larger flower, cut to the middle from the join between two of the petals, do this to the smallest flower as well.  At the cut, move one petal to overlap the one on the other side of the cut so that the paper makes a cone shape, secure with tape on the back.  Do this for both the cut flowers then curl the petals.  Using hot glue, secure the smallest flower into the cut larger one and then on to the uncut largest one.  Glue the gem into the center.  Adhere the flower over top of the flourish and on to the card.
This card took me a long time to make as I couldn't decide how to use the wonderful embossed background I had created without covering too much of it up.  I got there eventually and I'm super happy with how it turned out.

You can visit the Simon Says Stamp Wednesday Challenge blog here: http://www.simonsaysstampblog.com/wednesdaychallenge/

Till next time
Stacey

Sunday 27 July 2014

Spotlight on patterned paper: Hello card

Hello,

This card is the fourth installment in my series featuring patterned paper.  I have to apologize for not posting yesterday,  there was a party the night before and you can probably guess the rest.  I don't often make cards that are just to say hello, so I thought I'd shake things up a bit and create one.

Spotlight on patterned paper: Hello Card


Materials:

  • White card (Trophee, 240gsm, white linen), patterned paper, yellow paper
  • Flower nesting dies (Couture creations, Daisy)
  • Circle nesting dies (Couture creations)
  • Alphabet stamps (Cre8tiv)
  • Red (Rosie's studio) and gold (Martha Stewart) ink
  • Blue ribbon
Directions:
  1. Create a top folding card base from the white card.  Cut the patterned paper to leave a small border of white.  Using the nesting dies, cut a flower from the yellow paper and a circle from some white card.
  2. Stamp 'hello' with the red ink onto the circle.  Sponge the edge of the circle with red ink.  For the flower, sponge the gold ink around the edge.
  3. Adhere the blue ribbon to the patterned piece with some double sided tape and then adhere the circle to the flower and the flower to the ribbon.  Adhere the panel to the card base.
It is a very simple card which could be easily massed produced and the sentiment changed to reflect many different occasions.  That's it for today's post, see you next time!

Stacey

Saturday 19 July 2014

Spotlight on patterned paper: Peacock Sympathy Card

Hello!

Today I am continuing with my patterned paper mini series with a sympathy card.  Sympathy cards can be tricky to make as you need to create a card where the appearance doesn't overpower the sentiment.  Losing someone is never easy and your card must convey your feelings, not your card making skills.


Materials:

  • Black (Kasdak, 210gsm, raven black) and purple (Rosie's studio) card
  • Peacock patterned paper (Rosie's studio)
  • Peacock embossing folder (Cuttlebug)
  • Embossing ink pad (Versamark)
  • Gold embossing powder (Ranger)
  • "With Sympathy" sentiment stamp (Couture Creations)
  • Corner rounding punch (Fiskars)
Directions:
  1. Create the card base from the black card.  Cut a piece of the purple card to create a layer 0.5cm smaller than the card base.  Cut the patterned piece 0.5cm smaller than the purple piece.  Create another purple layer this time 2cm smaller than the patterned paper.
  2. Apply Versamark ink to the raised side of the embossing folder being careful not to get the ink on other sections.  Gently press the smaller of the two purple pieces over the embossing folder to pick up the ink.  Cover with the powder and heat set.  On a scrap piece of black card stamp and emboss the sentiment.  Cut it down and create a flag detail on one end.
  3. Round the corners of all your layers with the punch.  Begin adhering them together starting with the smallest purple piece on to the patterned piece then on to the second purple piece.  Adhere the whole panel to the card base.  Using dimensional foam, adhere the sentiment towards the bottom right of the card.
There you have it.  A sympathy card that uses an embossing folder in a different capacity than usual.  Stay tuned for next weeks installment in the patterned paper mini series.

Stacey

Saturday 12 July 2014

Spotlight on patterned paper: Masculine Birthday Card with Watercolour

Hello

Today I am presenting a masculine card as part of my mini series on patterned paper.  Patterned papers are really handy for masculine cards as you can get so many designs in every colour you can think of.


Materials:

  • Black (Kasdak, 210gsm, raven black) and white (Trophee, 240gsm, white linen) card.  Plus watercolour paper and black square patterned paper (Cre8tiv).
  • Distress ink pads in mowed lawn, salty ocean and black soot.
  • Alphabet stamps (I used two sets one from Rosie's Studio the other by Cre8tiv)
  • Black and light blue ink
  • Homemade enamel dots
Directions:
  1. Cut your card base from the black card.  Cut a piece of watercolour paper larger than the front of the card base.  Trim the patterned paper so that it is 1cm shorter on each side than the card base.  
  2. Create the watercolour background by pressing the distress ink pads in a random pattern over a piece of plastic or a craft sheet.  Spray with water to get the ink to pool up and press the watercolour piece into it moving it around to blend the colours together.  Repeat if desired. Leave to dry.  
  3. Cut down the watercolour piece so that it is 0.5 cm shorter than the card base.  Adhere the patterned piece on top and then the two pieces to the card base.
  4. Stamp the word "birthday" with the large alphabet stamps in the light blue ink on to the white card.  Using the distress inks again colour over the letters using a damp brush.  Stamp 'it's your' above the birthday in black ink.  Cut down the piece and adhere it to the card front.  Add a few enamel dots.
That's it for today's card, if you want to know how to make your own enamel dots go have a search on you tube for a video tutorial.
Join me next week for the continuation of the mini series!

Stacey

Saturday 5 July 2014

Spotlight on patterned paper: Birthday Owl Shaker Card

Hello!

This week begins a new mini series featuring patterned paper.  Once again I will create five cards showcasing patterned papers.  Patterned papers come in all different colours and designs from the bright and bold to the subtle and elegant.  I tend to buy my patterned paper in pads in both the small 6" x 6" and the large 12" x 12" sizes (and a few variants in between).  Using patterned paper for cards is an easy way to introduce colour and pattern and can provide a quick and easy background or focal image.  This weeks card uses a section of a large 12" x 12" sheet which has a total of nine of these cute owl images in boxes (so in theory you can create nine of these cards using just the one piece of patterned paper), as the focal image of the card.


Materials:

  • White (Trophee, 240 gsm, white linen) and purple (Rosie's Studio) card
  • A piece of acetate or plastic packaging
  • Owl patterned paper (Sugar and Spice Studio)
  • Various gems, sequins and glitter
  • 'Who loves you' stamp set by Hampton Arts
  • Pink, purple and green ink (Rosie's Studio)
  • Purple gel pen
Directions:
  1. Create a 12.7cm square card base from the white card.  Cut a 12.7cm square from the purple card.  Cut out the owl image from the patterned paper.  Using the image as a guide cut a slightly smaller square from the middle of the purple piece.
  2. Use the gel pen to create a scalloped border around the window and a dash line border around the outer edge of the purple piece.  Adhere the acetate to the back of the purple card and apply dimensional foam around the window on top of the acetate piece making sure there is no gaps for glitter to fall out of.
  3. Place your gems and glitter over top of the owl image and adhere the window panel over top (you may want to adhere a piece of computer paper behind the owl so there is more for the adhesive to stick to when you apply the window).  Adhere the piece to the card base.
  4. Stamp the sentiment in pink on to a scrap of white card.  Cut out and create a banner on the left end.  Adhere to the card using dimensional foam towards the bottom right corner.
  5. Stamp an owl in purple on the inside of the card, add a hat in green and your sentiment in pink.
Inside of the card

That's it for this week, making shaker cards isn't that tricky so long as you pick a shape with strait edges!  Join me next time for the second installment of the patterned paper mini series.

Stacey

P.S This project has been added to the Simon Says Stamp Wednesday Challenge blog.  Check it out at http://www.simonsaysstampblog.com/wednesdaychallenge/ .

Saturday 28 June 2014

Ice cream card

Hello

This week I thought I would prove to you all that I used one of my examples from lasts week's post on recycled craft.  I used the panel I created with paint and a milk bottle top as the main focal point on my card.  Here is a picture to refresh your memories:
My milk bottle top creation
After I had made the panel and shown it to a few people we all came to the same conclusion, it reminded us of mint chocolate chip ice cream.  So why fight a good thing?


Materials:
  • White (Trophee, 240gsm, white linen) and black card (Kaskad, 225gsm, raven black)
  • Black ink (Stazon, jet black)
  • Green and black paint
  • Gold gel pen
  • An ice cream stamp and a 'you're the sweetest' sentiment stamp (Fiskars, the sweet life)
  • Colouring pencils
  • Corner rounding punch (Fiskars)
Directions:
  1. Cut  the black card for a side folding card base.  Cut the white card for the panel and sentiment strip.
  2. Stamp the ice cream on a piece of scrap white, the sentiment on to the sentiment strip and then create the panel with the paint and milk bottle top.
  3. Colour the ice cream and cut it out leaving a small white border. Round the corners on the sentiment strip and create gold dash lines around the edge.
  4. Adhere the main panel and use the gel pen to create a gold line on left.  Round the corners on outer edge of the card base.
  5. Adhere the ice cream image with dimensional foam onto the sentiment strip and then the strip to the card base also with dimensional foam.
  6. Cut a panel for the inside of the card and round all the corners (I tend to use ordinary computer paper for this).  Create a flag shape from the left over panel and adhere to the top right corner.
Inside of the card

That's it for today's card, join me next week for the beginning of another mini series!
Stacey

P.S: I have again added this to the Simon Says Stamp Wednesday Challenge Blog.  Don't forget to check it out at http://www.simonsaysstampblog.com/wednesdaychallenge/

Saturday 21 June 2014

Spotlight on border stamps: Rainbow Stair Birthday Card

Hello

This is the final post for my one year anniversary and also my final post in my mini series on border stamps.  Today I have a card that uses a border stamp to create a rainbow effect up one side of the card.  In order to keep the background the main focal point I made the placed the sentiment off to one side using gold as a contrasting colour.


Materials:

  • White card (Trophee, 240gsm, white linen)
  • A selection of inks in rainbow colours
  • Gold embossing powder (Ranger)
  • Embossing ink (Versamark)
  • A border stamp (Cre8tiv) and a 'make a wish' stamp (Rosie's studio)
  • Gold gel pen
Directions:
  1. Make a top folding card base from the white card.  Cut a piece of white card big enough for the sentiment.
  2. Stamp border stamp beginning from the bottom with red ink, clean your stamp and repeat the image in orange above the red and a step off to the left.  Repeat this with the rest of the rainbow colours moving up and to the left each time.  Stamp and emboss sentiment on the small piece of white card, cut into banner shape at the bottom end.
  3. Adhere the sentiment to the top right hand side of the card using dimensional foam.  Use the gel pen to add dash lines around the banner and across the top of the card.
I love how colourful this card turned out.  I think it would be an easy card to mass produce even though it does use several colours of ink, you would just stamp all cards with the one colour before moving on to the next.  I also think that instead of rainbow you could do an ombre effect with several shades of one colour fading up the card.

Thank you for joining me during this very special week of posts!  Feel free to follow me on pinterest http://www.pinterest.com/rorystar/ or like me on facebook https://www.facebook.com/ConfessionsOfACardMakerBlog? .

Till next week
Stacey

Friday 20 June 2014

One year celebration! Friday: What I've learnt this year

Hello!

Welcome to the second last post for this week.  Today is all about what I have learnt over the past year while blogging.


1) Blogging is harder than it looks

Seriously, it is deceptive as you only really come into contact with blogs that are reasonably successful which gives you a false impression of how things are.  Also when you are doing research into how to get a blog up and running you read posts about how it only took a few months for them to find a 1000 followers etc. and then you look at your blog that's been going for the same amount of time and you still have none.  Another issue is finding suitable content to use on your blog, with a creative blog like mine sometimes you have to force yourself to create something to share (and sometimes it just doesn't happen).  The hardest bit of blogging is getting yourself out there to bring traffic to your site.  Simply posting to your blog isn't going to cut it (as I have personally discovered) and it is vital to achieving success that you go and interact with other bloggers who post about similar things and the people who are looking at your site.

2) Learn how to take good photographs

Photo's are really good to have within blog posts as it breaks up the text and gives yourself and your readers something to share on social media.  Having photo's that quickly show what the post is about is also great as just the image will draw people to your site.  But you have to take good photo's for it to work.  Having good lighting and a good backdrop is important for good pictures.  The camera isn't as important as you might think, I take all my photo's with a 'point-and-shoot' and I think they are just fine.

Example of a not so good photo (left) and a better photo (right).


3) Taking good photographs isn't enough, you need to edit them

Professional photographers edit their photo's and so should you.  I'm not saying you should pay good money for editing software though, I use picmonkey.com to edit my photo's and it is really easy to use.  Editing your photo's should include fixing the exposure, colours, re-sizing the image and placing a watermark and if you want, a title.

Unedited photo


Edited photo


4) Give credit where credit is due

No one likes a copy cat, and no one likes having there work stolen and passed off as someone else's.  Feel free to use other people's ideas for your own posts and creations but make sure you link to them in your post and acknowledge that you used it as your inspiration.  Don't flat out copy it though, take it, change it, and then use it.

5) Use trends to your advantage

Right now stenciling and water colour is a big trend in the card making world and by posting your creations using what's 'in' then you will more than likely increase traffic to your site as people seek out inspiration and 'how-to's' as they want to do it themselves.  Also seasonal trends are apparent and it is best to keep on top of them so that you aren't posting your Christmas stuff the week of Christmas and not leaving enough time for people to check out what you have done to use your ideas for themselves.

6) Pick something you are really interested in to blog about

Blogging requires a reasonable amount of work and if you aren't really into your subject matter then you will fail.  I've had a blog before, it lasted a month before I got bored and left it.  This time however, I'm blogging about something that I really enjoy doing and talking about.

7) Planning ahead is a good idea

For the weeks where suddenly everything and everyone needs your attention.  Planning ahead and having your posts at least partially finished will help so much during a busy week.  Also it can help when you are in a bit of a creative block as you can not do any crafting that week and pick it up later on when inspiration hits.

8) Try to inject some of your personality into your posts

No one likes a boring post, simple as that.  Put a bit of yourself out there and people will be more likely to enjoy reading your posts and come back another day to read more.

That's it for today, I know I have so much more to learn about blogging but I'm also really proud of how far I've come in one year.  Thanks for joining me today!

Till tomorrow.
Stacey

Thursday 19 June 2014

One year celebration! Thursday: The top ten items found at home that have crafty uses

Hello!

Thanks for joining me today, I am pleased to announce that today is the one year anniversary for my blog! YAY!  Truthfully I was never sure if I would even last a year blogging but I really enjoy making cards and I'm going to share them with the internet whether you like or not! :)  Today I go into the top ten items found at home to use in your crafty endevours.


1) Newspaper

Not only is newspaper a great idea when it comes to preventing mess, but it can also be added to cards as a background and to mixed media canvases for texture.  It can also be used as a way to create interest in a water colour background by rolling it up and dabbing it on the surface to remove colour.  Also it typically turns up for free in your mailbox.........

2) Milk bottle lids, bottle caps, or any lids really

These things are really quite useful.  They can be used as stamps, masks, or templates.  They can sit on your desk and hold all those little gems you are planning to stick on your card.  There really is many uses for them when it comes to craft projects, you just need a bit of imagination or a bit of googling.
Background design made with a milk bottle top, paint and the end of a craft knife.


3) Cardboard boxes and cereal boxes

Boxes can be used for all sorts of things, from a place to store your craft supplies to the materials to make a place to store craft supplies.  I've personally used cardboard to make hard book covers, a Tardis money box, a spring wreath and as paint pallets.  They also have uses as a place to spray paper inside to protect the work surface and to provide texture on mixed media projects.

4) Wrapping paper

Essentially as a replacement for patterned paper.  Also if you want to match your card to your gift using a piece of the wrapping paper makes this super easy!

5) Plastic spoons

There are many creations on the internet that use plastic spoons.  Can also be used for spooning embossing powder over ink and mixing paints.  Check this post for a large selection of plastic spoon crafts: http://www.architectureartdesigns.com/28-creative-ways-to-repurpose-reuse-plastic-spoons/

6) Tinfoil (aluminium foil)

Can be used to add a bit of bling to your card and can be used with embossing folders to create shiny textured pieces.  There is also the technique with string glued to cardboard in a pattern and overlaying it with the tinfoil.

7) Magazines

Use pages from magazines to create collage or punch out shapes to add to cards.  Try weaving strips together to create a background or a box.  Or just use pages to protect your work surface.

8) String

Simply add it to your cards as is or take it a step further by colouring the string with ink or paint.  Don't forget to tie a small piece through your buttons for a cute look!

9) Plastic packaging

Useful for making shaker cards, and backgrounds with ink and water.  Also great for mixing water colour and acrylic paints and can even be embossed with die cutting machines.  Certain plastics can also be shrunk in the oven to make embellishments for cards and other craft projects.
Plastic packaging embossed in a die cutting machine.


10) Fabric

Great for flowers and adding texture to your cards.  Also makes a good covering for boxes and even books.  Comes in many different colours and patterns just like paper and scraps from sewing projects can be used instead of throwing them away.

That's it for today's post, follow my board on pinterest for more recycled craft ideas: http://www.pinterest.com/rorystar/recycled-crafts/

Till tomorrow
Stacey

Wednesday 18 June 2014

One year celebration! Wednesday: Revisiting the first card I posted

Hello!

Today's post is all about the past.  I have revisited the first card I ever posted on this blog, you can find the post here: http://confessionsofacardmaker.blogspot.co.nz/2013/06/a-hearty-happy-birthday.html
and if you can't be bothered, here's a picture:

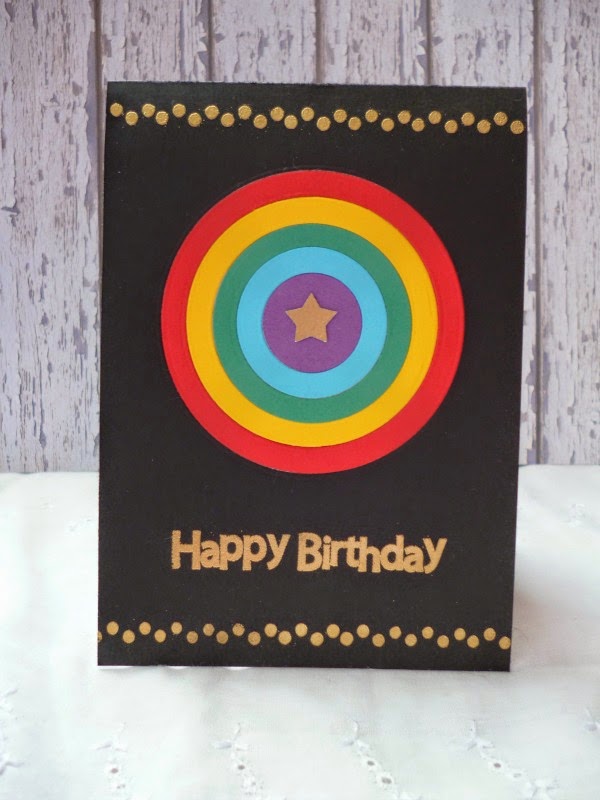
Today's card has taken quite a different turn compared to the original namely it uses none of the same colours (except black) and instead of a heart cut out I used circles and inlaid them.  I've also included a border stamp so it is also part of the mini series.

Can you tell how much my photography skills have improved?

Materials:

  • Black, red, yellow, green, blue, purple and white card (Various brands, mostly scraps).
  • Gold embossing powder (Ranger)
  • Embossing ink (Versamark)
  • Dotty border stamp (Papercraft) and 'Happy Birthday' stamp (Creativ)
  • Nesting Circle dies (Couture Creations)
  • Star punch
Directions:
  1. Create card base from the black card.  Cut out the largest sized circle from the top section of the card.  Use the same die to cut a circle from the red die, then the next sized down circle from yellow moving down a circle size for each colour.  Beginning with the red circle and your second largest die, cut a circle from the middle of all but the smallest of your circles.  This will enable your circles to 'nest' inside each other.  Cut the white card again to make two panels for the inside of your card.
  2. Stamp and emboss the sentiment below the circle and the border stamp above the circle and below the sentiment.  Emboss on scrap piece and punch star from it.
  3. Adhere top inside white panel with plenty of adhesive covering where circle window is.  Inlay circles to cover up the white and adhere the star in the middle.
  4. Use the left over circle pieces to decorate second inside panel and adhere to the inside of the card.
Inside of the card

That's it for today,  this card sort of reminds me a bit of Captain America's Shield and I think it would be super easy to adapt it to the right colour scheme.

Til tomorrow,
Stacey

Tuesday 17 June 2014

One year celebration! Tuesday: Top five places for inspiration

Hello!

Welcome to Tuesday's post of my one year celebration!  Today I am focusing on my top five places for inspiration when making cards.  So sit back, grab a cup of your beverage of choice and enjoy the ride!

1) Your imagination!

Within every single persons mind is some form of imagination.  While some people seem to have more, there is nothing stopping you from designing something purely out of your imagination.  At the beginning of a card making journey it typically doesn't come easy to create something purely from your own thoughts but as you progress and learn new things it starts to become easier to form ideas because of your experience and expanding knowledge.

2) Pinterest.

Ok, fair warning: while pinterest is a wonderful place filled with inspiration, it is also a wonderful place filled with inspiration that will suck you in and consume your every thought if you aren't careful.  However, there is so much to explore, not just card inspiration but all manner of diy, recipes, makeup advice, home improvement, fashion, cool gadgets and exercise tips.  It is a great place to find inspiration and tutorials and just everything really.  So try not to sit on it all day pinning things and actually use your pins to inspire you to create and you will be golden.  Follow me on pinterest and see exactly where I get my inspiration from. http://www.pinterest.com/rorystar/


3) Youtube.

I am a visual learner, so watching other people make cards (and various other things) provides a really good source of inspiration for me.  I follow quite a few different channels so I'm going to list a few of my favourite ones here, but don't let it stop you from exploring youtube.  It is a vast place filled with all sorts of videos, not just ones of cats playing the piano.

  • Kristina Werner
  • Jennifer McGuire
  • Prairie Paper and ink
  • Pootles Papercraft
  • Vicky Papaiaonnou
  • Darlene DeVries
  • Simon's Cat (not a craft channel, but I love it!)

4) Blogs.

Like this one! Blogs are everywhere and contain content about pretty much everything so you can bet your last dollar that there are many card blogs out there (all with varying levels of coolness) that you can explore and gain inspiration from.  All the card making channels I listed above have their own blogs as well so if you don't like watching people make cards, you can skip all that and just view the pictures!

5) Card magazines.

I buy a handful of these every year mostly just getting the ones that have cool 'free' gifts with them.  But the magazines themselves contain lots of cards, info on current trends and techniques and other crafty projects with instructions and templates.  I quite enjoy reading these magazines in my downtime and I find myself repeatedly coming back to them over and over again.

That's it for today's post.  I hope you enjoyed reading about where I get my inspiration from.  Leave a comment and let me know how you get inspired!

Till tomorrow,
Stacey