Saturday 28 June 2014

Ice cream card

Hello

This week I thought I would prove to you all that I used one of my examples from lasts week's post on recycled craft.  I used the panel I created with paint and a milk bottle top as the main focal point on my card.  Here is a picture to refresh your memories:
My milk bottle top creation
After I had made the panel and shown it to a few people we all came to the same conclusion, it reminded us of mint chocolate chip ice cream.  So why fight a good thing?


Materials:
  • White (Trophee, 240gsm, white linen) and black card (Kaskad, 225gsm, raven black)
  • Black ink (Stazon, jet black)
  • Green and black paint
  • Gold gel pen
  • An ice cream stamp and a 'you're the sweetest' sentiment stamp (Fiskars, the sweet life)
  • Colouring pencils
  • Corner rounding punch (Fiskars)
Directions:
  1. Cut  the black card for a side folding card base.  Cut the white card for the panel and sentiment strip.
  2. Stamp the ice cream on a piece of scrap white, the sentiment on to the sentiment strip and then create the panel with the paint and milk bottle top.
  3. Colour the ice cream and cut it out leaving a small white border. Round the corners on the sentiment strip and create gold dash lines around the edge.
  4. Adhere the main panel and use the gel pen to create a gold line on left.  Round the corners on outer edge of the card base.
  5. Adhere the ice cream image with dimensional foam onto the sentiment strip and then the strip to the card base also with dimensional foam.
  6. Cut a panel for the inside of the card and round all the corners (I tend to use ordinary computer paper for this).  Create a flag shape from the left over panel and adhere to the top right corner.
Inside of the card

That's it for today's card, join me next week for the beginning of another mini series!
Stacey

P.S: I have again added this to the Simon Says Stamp Wednesday Challenge Blog.  Don't forget to check it out at http://www.simonsaysstampblog.com/wednesdaychallenge/

Saturday 21 June 2014

Spotlight on border stamps: Rainbow Stair Birthday Card

Hello

This is the final post for my one year anniversary and also my final post in my mini series on border stamps.  Today I have a card that uses a border stamp to create a rainbow effect up one side of the card.  In order to keep the background the main focal point I made the placed the sentiment off to one side using gold as a contrasting colour.


Materials:

  • White card (Trophee, 240gsm, white linen)
  • A selection of inks in rainbow colours
  • Gold embossing powder (Ranger)
  • Embossing ink (Versamark)
  • A border stamp (Cre8tiv) and a 'make a wish' stamp (Rosie's studio)
  • Gold gel pen
Directions:
  1. Make a top folding card base from the white card.  Cut a piece of white card big enough for the sentiment.
  2. Stamp border stamp beginning from the bottom with red ink, clean your stamp and repeat the image in orange above the red and a step off to the left.  Repeat this with the rest of the rainbow colours moving up and to the left each time.  Stamp and emboss sentiment on the small piece of white card, cut into banner shape at the bottom end.
  3. Adhere the sentiment to the top right hand side of the card using dimensional foam.  Use the gel pen to add dash lines around the banner and across the top of the card.
I love how colourful this card turned out.  I think it would be an easy card to mass produce even though it does use several colours of ink, you would just stamp all cards with the one colour before moving on to the next.  I also think that instead of rainbow you could do an ombre effect with several shades of one colour fading up the card.

Thank you for joining me during this very special week of posts!  Feel free to follow me on pinterest http://www.pinterest.com/rorystar/ or like me on facebook https://www.facebook.com/ConfessionsOfACardMakerBlog? .

Till next week
Stacey

Friday 20 June 2014

One year celebration! Friday: What I've learnt this year

Hello!

Welcome to the second last post for this week.  Today is all about what I have learnt over the past year while blogging.


1) Blogging is harder than it looks

Seriously, it is deceptive as you only really come into contact with blogs that are reasonably successful which gives you a false impression of how things are.  Also when you are doing research into how to get a blog up and running you read posts about how it only took a few months for them to find a 1000 followers etc. and then you look at your blog that's been going for the same amount of time and you still have none.  Another issue is finding suitable content to use on your blog, with a creative blog like mine sometimes you have to force yourself to create something to share (and sometimes it just doesn't happen).  The hardest bit of blogging is getting yourself out there to bring traffic to your site.  Simply posting to your blog isn't going to cut it (as I have personally discovered) and it is vital to achieving success that you go and interact with other bloggers who post about similar things and the people who are looking at your site.

2) Learn how to take good photographs

Photo's are really good to have within blog posts as it breaks up the text and gives yourself and your readers something to share on social media.  Having photo's that quickly show what the post is about is also great as just the image will draw people to your site.  But you have to take good photo's for it to work.  Having good lighting and a good backdrop is important for good pictures.  The camera isn't as important as you might think, I take all my photo's with a 'point-and-shoot' and I think they are just fine.

Example of a not so good photo (left) and a better photo (right).


3) Taking good photographs isn't enough, you need to edit them

Professional photographers edit their photo's and so should you.  I'm not saying you should pay good money for editing software though, I use picmonkey.com to edit my photo's and it is really easy to use.  Editing your photo's should include fixing the exposure, colours, re-sizing the image and placing a watermark and if you want, a title.

Unedited photo


Edited photo


4) Give credit where credit is due

No one likes a copy cat, and no one likes having there work stolen and passed off as someone else's.  Feel free to use other people's ideas for your own posts and creations but make sure you link to them in your post and acknowledge that you used it as your inspiration.  Don't flat out copy it though, take it, change it, and then use it.

5) Use trends to your advantage

Right now stenciling and water colour is a big trend in the card making world and by posting your creations using what's 'in' then you will more than likely increase traffic to your site as people seek out inspiration and 'how-to's' as they want to do it themselves.  Also seasonal trends are apparent and it is best to keep on top of them so that you aren't posting your Christmas stuff the week of Christmas and not leaving enough time for people to check out what you have done to use your ideas for themselves.

6) Pick something you are really interested in to blog about

Blogging requires a reasonable amount of work and if you aren't really into your subject matter then you will fail.  I've had a blog before, it lasted a month before I got bored and left it.  This time however, I'm blogging about something that I really enjoy doing and talking about.

7) Planning ahead is a good idea

For the weeks where suddenly everything and everyone needs your attention.  Planning ahead and having your posts at least partially finished will help so much during a busy week.  Also it can help when you are in a bit of a creative block as you can not do any crafting that week and pick it up later on when inspiration hits.

8) Try to inject some of your personality into your posts

No one likes a boring post, simple as that.  Put a bit of yourself out there and people will be more likely to enjoy reading your posts and come back another day to read more.

That's it for today, I know I have so much more to learn about blogging but I'm also really proud of how far I've come in one year.  Thanks for joining me today!

Till tomorrow.
Stacey

Thursday 19 June 2014

One year celebration! Thursday: The top ten items found at home that have crafty uses

Hello!

Thanks for joining me today, I am pleased to announce that today is the one year anniversary for my blog! YAY!  Truthfully I was never sure if I would even last a year blogging but I really enjoy making cards and I'm going to share them with the internet whether you like or not! :)  Today I go into the top ten items found at home to use in your crafty endevours.


1) Newspaper

Not only is newspaper a great idea when it comes to preventing mess, but it can also be added to cards as a background and to mixed media canvases for texture.  It can also be used as a way to create interest in a water colour background by rolling it up and dabbing it on the surface to remove colour.  Also it typically turns up for free in your mailbox.........

2) Milk bottle lids, bottle caps, or any lids really

These things are really quite useful.  They can be used as stamps, masks, or templates.  They can sit on your desk and hold all those little gems you are planning to stick on your card.  There really is many uses for them when it comes to craft projects, you just need a bit of imagination or a bit of googling.
Background design made with a milk bottle top, paint and the end of a craft knife.


3) Cardboard boxes and cereal boxes

Boxes can be used for all sorts of things, from a place to store your craft supplies to the materials to make a place to store craft supplies.  I've personally used cardboard to make hard book covers, a Tardis money box, a spring wreath and as paint pallets.  They also have uses as a place to spray paper inside to protect the work surface and to provide texture on mixed media projects.

4) Wrapping paper

Essentially as a replacement for patterned paper.  Also if you want to match your card to your gift using a piece of the wrapping paper makes this super easy!

5) Plastic spoons

There are many creations on the internet that use plastic spoons.  Can also be used for spooning embossing powder over ink and mixing paints.  Check this post for a large selection of plastic spoon crafts: http://www.architectureartdesigns.com/28-creative-ways-to-repurpose-reuse-plastic-spoons/

6) Tinfoil (aluminium foil)

Can be used to add a bit of bling to your card and can be used with embossing folders to create shiny textured pieces.  There is also the technique with string glued to cardboard in a pattern and overlaying it with the tinfoil.

7) Magazines

Use pages from magazines to create collage or punch out shapes to add to cards.  Try weaving strips together to create a background or a box.  Or just use pages to protect your work surface.

8) String

Simply add it to your cards as is or take it a step further by colouring the string with ink or paint.  Don't forget to tie a small piece through your buttons for a cute look!

9) Plastic packaging

Useful for making shaker cards, and backgrounds with ink and water.  Also great for mixing water colour and acrylic paints and can even be embossed with die cutting machines.  Certain plastics can also be shrunk in the oven to make embellishments for cards and other craft projects.
Plastic packaging embossed in a die cutting machine.


10) Fabric

Great for flowers and adding texture to your cards.  Also makes a good covering for boxes and even books.  Comes in many different colours and patterns just like paper and scraps from sewing projects can be used instead of throwing them away.

That's it for today's post, follow my board on pinterest for more recycled craft ideas: http://www.pinterest.com/rorystar/recycled-crafts/

Till tomorrow
Stacey

Wednesday 18 June 2014

One year celebration! Wednesday: Revisiting the first card I posted

Hello!

Today's post is all about the past.  I have revisited the first card I ever posted on this blog, you can find the post here: http://confessionsofacardmaker.blogspot.co.nz/2013/06/a-hearty-happy-birthday.html
and if you can't be bothered, here's a picture:

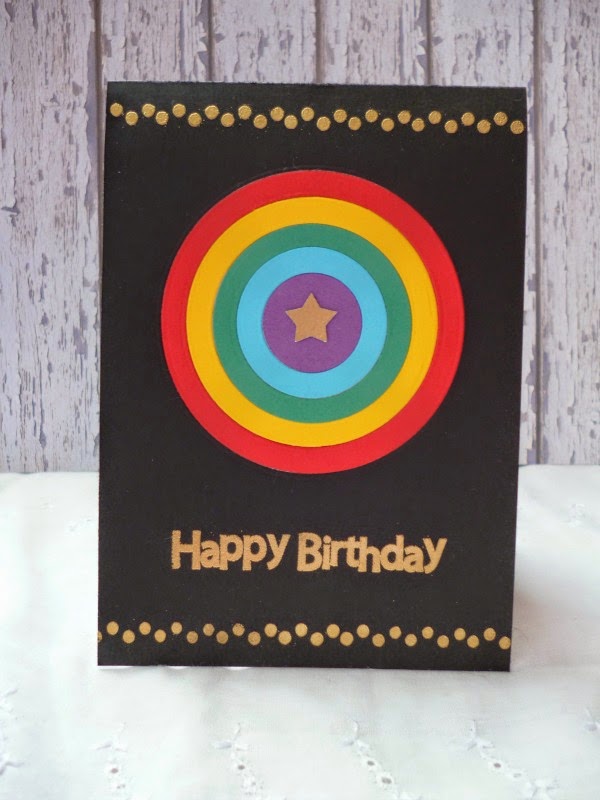
Today's card has taken quite a different turn compared to the original namely it uses none of the same colours (except black) and instead of a heart cut out I used circles and inlaid them.  I've also included a border stamp so it is also part of the mini series.

Can you tell how much my photography skills have improved?

Materials:

  • Black, red, yellow, green, blue, purple and white card (Various brands, mostly scraps).
  • Gold embossing powder (Ranger)
  • Embossing ink (Versamark)
  • Dotty border stamp (Papercraft) and 'Happy Birthday' stamp (Creativ)
  • Nesting Circle dies (Couture Creations)
  • Star punch
Directions:
  1. Create card base from the black card.  Cut out the largest sized circle from the top section of the card.  Use the same die to cut a circle from the red die, then the next sized down circle from yellow moving down a circle size for each colour.  Beginning with the red circle and your second largest die, cut a circle from the middle of all but the smallest of your circles.  This will enable your circles to 'nest' inside each other.  Cut the white card again to make two panels for the inside of your card.
  2. Stamp and emboss the sentiment below the circle and the border stamp above the circle and below the sentiment.  Emboss on scrap piece and punch star from it.
  3. Adhere top inside white panel with plenty of adhesive covering where circle window is.  Inlay circles to cover up the white and adhere the star in the middle.
  4. Use the left over circle pieces to decorate second inside panel and adhere to the inside of the card.
Inside of the card

That's it for today,  this card sort of reminds me a bit of Captain America's Shield and I think it would be super easy to adapt it to the right colour scheme.

Til tomorrow,
Stacey

Tuesday 17 June 2014

One year celebration! Tuesday: Top five places for inspiration

Hello!

Welcome to Tuesday's post of my one year celebration!  Today I am focusing on my top five places for inspiration when making cards.  So sit back, grab a cup of your beverage of choice and enjoy the ride!

1) Your imagination!

Within every single persons mind is some form of imagination.  While some people seem to have more, there is nothing stopping you from designing something purely out of your imagination.  At the beginning of a card making journey it typically doesn't come easy to create something purely from your own thoughts but as you progress and learn new things it starts to become easier to form ideas because of your experience and expanding knowledge.

2) Pinterest.

Ok, fair warning: while pinterest is a wonderful place filled with inspiration, it is also a wonderful place filled with inspiration that will suck you in and consume your every thought if you aren't careful.  However, there is so much to explore, not just card inspiration but all manner of diy, recipes, makeup advice, home improvement, fashion, cool gadgets and exercise tips.  It is a great place to find inspiration and tutorials and just everything really.  So try not to sit on it all day pinning things and actually use your pins to inspire you to create and you will be golden.  Follow me on pinterest and see exactly where I get my inspiration from. http://www.pinterest.com/rorystar/


3) Youtube.

I am a visual learner, so watching other people make cards (and various other things) provides a really good source of inspiration for me.  I follow quite a few different channels so I'm going to list a few of my favourite ones here, but don't let it stop you from exploring youtube.  It is a vast place filled with all sorts of videos, not just ones of cats playing the piano.

  • Kristina Werner
  • Jennifer McGuire
  • Prairie Paper and ink
  • Pootles Papercraft
  • Vicky Papaiaonnou
  • Darlene DeVries
  • Simon's Cat (not a craft channel, but I love it!)

4) Blogs.

Like this one! Blogs are everywhere and contain content about pretty much everything so you can bet your last dollar that there are many card blogs out there (all with varying levels of coolness) that you can explore and gain inspiration from.  All the card making channels I listed above have their own blogs as well so if you don't like watching people make cards, you can skip all that and just view the pictures!

5) Card magazines.

I buy a handful of these every year mostly just getting the ones that have cool 'free' gifts with them.  But the magazines themselves contain lots of cards, info on current trends and techniques and other crafty projects with instructions and templates.  I quite enjoy reading these magazines in my downtime and I find myself repeatedly coming back to them over and over again.

That's it for today's post.  I hope you enjoyed reading about where I get my inspiration from.  Leave a comment and let me know how you get inspired!

Till tomorrow,
Stacey

Monday 16 June 2014

One year celebration! Monday: Top ten basic craft supplies

Hello!

Believe it or not this week marks the one year anniversary of my blog.  While it hasn't become the most popular blog on the web, I'm still happy with the progress I have made over the last year.  So to celebrate the occasion I'm doing a post every day this week focusing on various aspects of card making.

Today's post is all about the top ten basic craft supplies that I think every card maker should own.
top ten craft supplies

1) A craft knife, cutting mat, steel rule, and pencil combo.


While paper trimmers are super cool and handy, you can't beat a good knife and rule for cutting paper.  A cutting mat on top of your work surface is a wonderful idea even if you have no intention of cutting everything as it provides grid lines (to help get things nice and straight), a slightly softer surface (which is good for stamping), and can be easily cleaned.  I've said a steel rule because (trust me I know this from experience) plastic rules won't last long.  They are also great because the little marks wont rub off leaving you to guess where 2.8cm actually is......

2) A selection of ink pads.

I'm not talking about the expensive ink pads here, I'm talking about the cheaper ones that I tend to find in department stores that come in a variety of colours.  Most of my ink pads are of these cheaper ones, mostly because I don't want to spend heaps of money on ink, but also because they do work reasonably well (I have had a few fails with them, but with the amount of success I've had, I can't complain).  I'm not saying never buy the expensive ink pads, I've got a couple myself, buy them in colours you will use all the time, because then you will get the best value for money and you will have the colours you aren't so fond of *cough* orange *cough* from the cheaper inks when you need them.
If you are wondering what the numbers are on top of the ink pads it is just a code number as I have stamped all my inks onto a couple of pieces of paper that hang on the wall for reference when I'm crafting.

3) Good white card.

I tend to buy my white card in the packets of 12 from stationery shops.  I like the 240gsm white linen card as it is heavy and has a nice texture to it.  When it comes to other colours, I'm more likely to find a cheaper alternative as I won't be using them so often.

4) A bone folder.

Super handy for getting pieces of card to fold over and stay folded over, though you can sort of get away with a rule for this but you are more likely to leave marks on your paper.

5) A stylus tool.

Handy dandy tool for scoring paper and card to help with folding or to add texture.  Also really good at making dots with nail polish if you dabble in nail art like I sometimes do.

6) A good sentiment stamp set.

If you are going to get stamps, begin with a sentiment stamp set, one that says almost everything.  I've got one from Sulivans and it has a great variety such as 'happy birthday', 'thank you', 'best wishes', 'thinking of you', and 'congratulations'.  Having a stamp set like this is useful for many projects.

7) A selection of things that are sticky.

Here I'm referring to how you will adhere things to your card.  My number one adhesive is double sided tape followed by double sided foam tape.  While many people use those tape runner things (they are pretty cool) I don't because I get my double sided tape way cheaper than the tape runners and if you haven't noticed by now I'm a bit frugal.  Also liquid glue is useful (I have a standard PVA glue and mod podge) for projects that require something a little stronger than tape.  I also tend to use regular cello tape frequently to adhere things to the back of panels and such where I know it won't be seen.  I've also got a small selection of 'washi' tapes that not only provide decoration for your cards but also can be used to hold bits of paper in place when die cutting or water colouring.


8) Scissors.

Pretty self explanatory, things need to be cut out or cut down.  Tape need to be snipped into submission.  Edges of cards need to be straightened when you stick the paper on wonky.  Many uses for the scissor.  I only have one pair but the amount of times I've wished for a bigger or smaller pair is starting to become ridiculous.  Though you can get away with just one pair provided they are of reasonable quality.

9) Colouring pencils and gel pens.

I have a set of faber castell pencils that I love to use on cards for colouring images.  I think having a set of reasonable pencils (i.e. not cheap kids ones) is good to have on hand for adding both soft and intense colour.  I also use gel pens frequently, I got a simple set a long time ago which has a decent selection of colours and I use them to add dash lines, lines, dots, and a bit of sparkle here and there.


10) A stamp press.

I only got one of these a few months ago and I haven't stopped using the thing since.  I brought a Fiskars brand press and I just love it.  Before I got one I only had a couple of small sized acrylic blocks so if I wanted to stamp larger images or border stamps I had to use the 'c' plate from my cuttlebug and that caused all sorts of problems...  The bonus with the Fiskars press is the grid lines and the sponge 'feet' that make it so much easier to line up stamps straight and stamp them in exactly the spot you want them to be.

Bonus supplies (that I think are handy):

- Patterned paper

Even a selection of plain coloured paper is great as you can use stamps to create patterns, but some patterns just can't be replicated with stamps and having pretty paper on hand is great if you are in a hurry.

- Embossing powders

In at least gold, sliver and clear.

- Glitter and glitter glue

Because shiny things are good. :)

- Buttons, rhinestones and pearls

Because embellishments can make a card.


- Die cutting machine

With a couple of embossing folders (swirls, dots, and stripes) and a few nesting dies (circles, hearts, and flowers) and if you can afford it some alphabet dies.

- Water colour paints

It's very on trend right now and they also make easy backgrounds.

- A heat tool

Though I got away with using a toaster for a long time, so long as you don't mind singeing your fingers!

- A scoring board

Handy for making card bases and those rosette things.

There you go, what I consider to be essential craft supplies for the wannabe card maker, plus the few 'extras' that I think are also great to have.

Till tomorrow.
Stacey

Saturday 14 June 2014

Spotlight on border stamps: Butterfly Chevron Card

Hello

Today I am continuing on with my spotlight on border stamps mini series.  I decided to stray from the normal sized card and make a mini one instead.  This card caused me a lot of grief, but then again I was having one of those days where things didn't want to co-operate with me......  While crafting I broke a wire in my bra, got pink ink everywhere and gave up on making the envelope for it.  Even after all this trouble I'm super happy with how the second version turned out (yes, I had to start again!).
Butterfly Chevron Card


Materials:

  • White card (Trophee, 240gsm, white linen), silver paper (Rosie's studio).
  • Pink ink (Tim Holtz distress, picked raspberry), silver ink (Martha Stewart) and a sponge 
  • Chevron stencil (Memory box)
  • Lace patterned border stamp (Cre8tiv)
  • Butterfly die (fairly certain mine was from a magazine)
  • Alphabet dies (Cuttlebug)
  • Silver gel pen
  • Pink gems
Directions:
  1. Create a card base measuring 9cm wide by 10cm tall from the white card.  Die cut  the butterfly and the word 'hi' from the silver paper.  Cut an additional thin strip from the silver paper.
  2. Using the stencil, sponge and pink ink, create the background.  Stamp the border image along edge with the silver ink.
  3. Adhere the butterfly and 'hi' sentiment onto the front of the card, add three gems to the body section of the butterfly and use the silver gel pen to create the antenna and a trail for the butterfly.
That's it for today's card, stay tuned for Monday for the beginning of a week of celebration posts for the blog's one year anniversary! Again I've added this post to the Simon Says Stamp Wednesday Challenge blog at http://www.simonsaysstampblog.com/wednesdaychallenge/ , check it out!

Till next time,
Stacey

Saturday 7 June 2014

Spotlight on border stamps: Chevron Hello Card

Hello,

This week I have a more masculine card to share that uses a chevron stamp for the background.  As with most crafters, I struggle to create masculine cards because it's just easier to put flowers, butterflies and loads of glitter onto a card than it is to keep it clean and bold and manly.  So I challenged myself this week to make a masculine card!  This is what I came up with:
I even left the ends of the ribbon frayed!

Materials:

  • White card (Trophee, 240gsm, white linen), red card (Trophee, 210gsm, intensive red) and grey paper.
  • Yellow ribbon (Rosie's studio)
  • Sentiment die cut (or you could make your own with stamps)
  • Red ink in two shades (Rosie's studio)
  • Chevron border stamp (Creativ)
  • Sliver and red gel pens
Directions:
  1. Create a top folding card base from the white card.  Cut a tag each from the red and grey paper.
  2. On the card base, stamp the chevron vertically alternating the direction and ink shades as you go, I suggest starting the stamping in the middle.
  3. Adhere the two tags together offset with dimensional foam.  Use the sliver gel pen to create a dash line border around the red tag and use the red gel pen to create three lines across the bottom of the grey tag.  Thread the ribbon through the holes and tie in a knot.  Adhere the sentiment die cut and then the whole piece to your card base.
Overall, it is a pretty simple card and didn't take me long to create at all.  Now I've done a masculine card, I can go back to my glitter and frills!

Till next week
Stacey

P.S.  I have added this card to the Simon Says Stamp Wednesday Challenge.  Check it out at http://www.simonsaysstampblog.com/wednesdaychallenge/