Saturday 14 December 2013

Happy Birthday Negative Butterflies Card

Hello!

Today I am presenting a birthday card for your viewing pleasure.  Often at this time of year we are so wrapped up in Christmas that birthday's can be overshadowed.  So today we celebrate those with a December birthday to let them know they are special to.

Materials Needed:

  • Card base (white)
  • Purple paper (one dotted, one glitter, one plain)
  • Butterfly die
  • Happy Birthday stamp
  • Sliver embossing powder and embossing ink
  • Sliver gel pen
To make this card:
  • Cut the dotted paper so that it is 0.5 cm shorter on each side than your card base.  Using the butterfly die, cut three butterflies out of the paper.
  • Cut the glitter paper into three pieces that are big enough to cover the card base underneath each of the butterflies.  Use a pencil to mark the edges of each butterflies on the card base and adhere the glitter paper so that all marks are covered.  Adhere the dotted paper to the card base with dimensional foam.
  • Stamp and emboss the Happy Birthday onto the plain purple paper.  Cut and trim to make a banner shape, then adhere to the bottom section of the card with foam.  Create a dotted line border with the gel pen.
There you go.  This card is actually quite easy to make, the hardest part is lining up the glitter paper underneath so that none of the white shows through. It would be easier to just cut a piece of the glitter paper exactly the same size as the dotted paper, but I feel like its a bit of a waste when so much of it is covered up.
This card is easily adapted too, changing the colour, shape of the die, and the sentiment will produce a variety of cards for many occasions.

Til next week!
Stacey

P.S Don't forget to check out the facebook page for Confessions of a Card Maker for extra inspiration!

Saturday 7 December 2013

Christmas Card Number Seven

Hello,

It seems that Saturdays are now my posting day, so I may just continue on with this pattern and see how it goes.

Today's card is designed to be easily massed produced as well as being easy to change aspects of it so you don't get bored after the 20th card.  I made three different versions with the same design in less than an hour (I spent most of this time picking what paper I wanted to use!).


As you can see they all have a repeated stamp across the top, the gold stripe, the embossed sentiment and the patterned paper.  The differences lie in the stamps used, the paper used and the size of the paper used.

Materials needed:
  • Patterned paper
  • Gold paper
  • Red, green and embossing ink
  • Gold embossing powder
  • Christmas themed stamp and a "Merry Christmas" stamp
  • Gold gel pen
  • White card base
To make the card:
Cut a piece of the patterned paper to fit across the bottom of the card base.  Stamp and emboss the Merry Christmas towards the middle right of the paper.  Adhere the piece to the card base.  Cut a small strip of gold paper and adhere above the patterned paper.  Stamp the Christmas themed stamp several times above the gold paper alternating the colours.  Using the gel pen, colour small portions of each of the stamps.

And there you have it, a simple design to make a bunch of Chirstmas cards!
Till next time
Stacey


Saturday 30 November 2013

Christmas Card Number Six

Hello

Sorry for the delay this week, I've just had one of those weeks where everything I touch seems to fall apart.
Today's card features the humble Christmas tree again and a really bold colourful background.

Materials needed:

  • 3 pieces of green patterned paper, one striped pattern paper, and two light coloured patterned papers.
  • Sliver embossing powder and embossing ink
  • "holiday greetings' stamp
  • A sliver and black gel pen
To make the card:
  • Cut the striped paper to fit the front of the card and adhere.  Cut a small strip of one of the light coloured papers and adhere towards the bottom of the card.
  • From each of the green papers, cut a Christmas tree in three different sizes.  If desired add some embossing or glitter to the trees.  Cut a heart from the other light patterned paper.  From a scrap piece of paper cut out three small rectangles to be the trunk of the trees.
  • Stamp and emboss the sentiment on to the heart.
  • Adhere two of the Christmas trees directly to the front of the card.  Using dimensional foam adhere the third Christmas tree in between the first two.  Also with dimensional foam, adhere the heart towards the right side of the card.
  • Using the black gel pen create dash lines around the outside of the heart.  With the silver pen do the same around the background piece.
I hope today's card has provided you with some inspiration.
Till next time
Stacey

Wednesday 20 November 2013

Christmas Card Number Five

Hello!

Today's card features a new stamp set I got last week that says exactly what I feel about Christmas, that it should be about family.

Materials needed:

  • Green, red, and two different patterned papers
  • Gold ribbon
  • Gold embossing powder and embossing ink
  • Sentiment stamp
  • Gold gel pen
To make the card:
  • Stamp and emboss the sentiment on to the red piece of paper.  Trim the two patterned pieces of paper down to create small sections to adhere on to the red piece.  Use the gel pen to create a few dash lines and cut a triangle from the bottom.
  • Pinch the ribbon in the middle and tie it loosely with some string, adhere the middle down onto the green paper and the ends of the ribbon on to the back of the paper.  Secure the green paper to your card base.
  • Using dimensional adhesive, adhere the red piece over the center of the ribbon.
There you have it.  I love what this sentiment says, it goes into the deeper meaning of Christmas not just the 'buy everything' kind of Christmas that we are subjected to every year.

Till next time
Stacey

Wednesday 13 November 2013

Christmas Card Number Four

Hello!

Welcome back, today's Christmas card has a modern sleek look with purple and sliver colours.
Materials:

  • White and purple card
  • Sliver embossing powder and embossing ink
  • A 'Merry Christmas' stamp
  • A star shaped punch
  • Gems
To make this card:
Punch out 15 stars from the purple card and three from the white.  Adhere 5 purple and 1 white star together with the white star on the top, do this two more times.  Adhere the stacked stars onto the card base and form a line of gems from the top of the card down to the top of each star (I only used silver coloured gems and coloured every second gem purple with a sharpie).  Stamp and emboss the 'Merry Christmas' on a small piece of white card and cut a slightly bigger piece of purple card to be adhered behind the sentiment.  Adhere the sentiment with dimensional foam to the bottom portion of the card.

There you have it!  The stars are a little fiddly and you do use quite a few gems, but if you want to replicate this look in large quantities using a couple of gel pens in place of the gems would make the card much faster and cheaper to produce.

Till next time
Stacey

Thursday 7 November 2013

Christmas card number three

Hello!

Sorry I didn't post yesterday, I had a job interview in the morning and ended up spending most of the day out of the house.
So this week is another Christmas card which features the classic image of Santa.
To make this card you will need:

  • Green and white card
  • Swirly embossing folder
  • A Santa stamp and a Merry Christmas stamp
  • Felt pens (I used a combination of sharpies and colouring pencils)
  • Black and embossing ink
  • Silver embossing powder
  • Clear glitter
  • PVA Glue
  • Sliver gems
To begin, emboss the green card in the embossing folder and adhere to the card base.  Stamp the Santa in black on a piece of white card and colour him in.  Mix a small amount of glitter with the glue and gently paint it onto the Santa (I put the glitter along the fluffy edges of his coat and hat).  Set aside to dry.  Stamp and emboss the Merry Christmas on a strip of the white card and cut a triangle out of one end to make a banner.  When the Santa is all dry adhere the white strip with the sentiment behind him with dimensional foam.  Place dimensional foam behind the rest of the Santa and regular adhesive behind the sentiment and adhere to the front of the card.  Place a few gems on the background because its for Christmas and Christmas is supposed to sparkle.

And there you have it! It is quite an easy card as it doesn't contain many elements, but the colouring can take a long time and the drying of the glitter/glue mix just adds to the time taken.  I still think its cute though, what do you think?  Let me know by commenting, don't be shy!

Also, check out the new facebook page for Confessions of a Card maker!
https://www.facebook.com/ConfessionsOfACardMakerBlog
Don't forget to like and share it with your friends. :)

Till next week!
Stacey

Wednesday 30 October 2013

Christmas Card Number Two

Hello

The Christmas theme continues this week with my second Christmas card and envelope creation.  This week I went with a blue and silver colour scheme using embossing powder to make the silver stand out.  If you don't have embossing powder you can use a silver ink pad instead, but the results wont be as bright.

Here is the card:

Materials needed:

  • Navy card for the base and the panel piece
  • Silver embossing powder and embossing ink
  • Silver string
  • A 'Merry Christmas' stamp and a star background stamp
  • A circle die or template
  • Corner rounder punch
Other materials for the envelope:
  • Blue patterned paper
  • White card
  • Silver embossing powder and embossing ink
  • Blue glitter glue
  • Star border stamp
  • Envelope punch board
To make the card:
For the panel, use the circle die or template to cut out a circle in the top half of the panel.  Stamp the 'Merry Christmas' below the cut circle, sprinkle over the embossing powder and heat set it.  Wrap the string around the top of the card to make the circle look like an ornament.  Round all the corners.
For the card base, stamp the star background over the top half making sure that it covers enough of the card so that it will fill up the entire circle when the panel is place over top (I stamped mine twice in order to cover the gap).  Use the embossing powder here too.  Round all the corners.
Adhere the panel onto the card base with dimensional foam.

For the envelope:
Create the envelope using the punch board with the blue patterned paper.  On the white card stamp the star border along the top and bottom edges and emboss with the powder.  Adhere the white card to the front of the envelope.  Using the glitter glue, add small dots of sparkle on the front for extra detail.

There you have it!  I was really impressed at how well this card turned out.  It could be easily replicated but could prove a bit costly with all the embossing powder so I would suggest ink instead.

Stay tuned for next weeks card.
Stacey


Wednesday 23 October 2013

Here comes Christmas!

Hello

I'm back! and I'm here with my very first Christmas card of the year.  I have a love/hate relationship with Christmas, while I enjoy the family and the presents and all the glitter; I really hate Christmas Carols, the requirement to spend so much money and the fact that all Christmas items are winter themed (I live in the southern hemisphere so its summer at Christmas time and it seems weird to be singing about snow and sitting in front of the fire).  I guess I just wish there was more summer themed Christmas stuff out there so that I don't feel so left out.  Also, there has been Christmas decorations out at the bigger department stores since the beginning of October.  This annoys me as I want Christmas to be a more private experience between families and I don't like being rushed into it.  I'm only starting the cards now because it can take me such a long time to decide what I want to do, that and I currently don't have much on in my life so I've got time to spare.

ANYWAY.....
Here is today's card:


As you can see I also made an envelope for it.
Its a fairly traditional type card as it uses green, gold and white, but has a modern element with the triangle tree and the swirled background.

To make this card you will need:

  • One piece of green patterned paper, green glitter paper, white card, gold paper and your card base (tall and skinny).
  • a star shaped punch or a star shaped embellishment in gold
  • a 'merry Christmas' stamp
  • and the usual cutting knife, ruler, adhesive etc
additional items for the envelope:
  • One piece of green patterned paper and a tag shaped die cut.
  • gold embossing powder
  • a border stamp
  • gold string
  • star shaped embellishments in gold
  • envelope punch board.
So for the card it is as simple as adhering the green paper to the base and cutting a triangle from the glitter paper and sticking it on with dimensional adhesive. Then stamping the image onto the white card, trimming it and creating a border from the gold paper by cutting a slightly larger square from it.  Before you stick the stamped image to the gold paper you might like to punch out a few stars (I got six easily from my piece) out of the gold paper (because its too pretty to waste by hiding most of it behind something else).  I adhered this piece to the card with dimensional adhesive as well and used one of the stars punched from the gold paper to top the tree.

It is a good card for creating multiples of (which is needed at Christmas time).  If you wanted to make it a bit more detailed you could apply some decoration to the tree with gold thread or use a hole punch to make small circles out of coloured paper and stick them on as baubles.

The envelope is an extra step that isn't entirely necessary, I made the envelope for it as the card size I used is quite different from my usual size and also due to me recently getting one of those punch boards and I though it was a good chance to get to use it.  So I just followed the instructions that came with the punch board thing and then decided to decorate the front a bit.  The tag was one that I had hidden rather deep within my collection of craft items.  I gold embossed one of my border stamps along the bottom edge to give it more detail and to tie in with the colours of the card.  I threaded some gold thread through the hole and held down the end with one of the stars I punched out earlier.  I placed a couple of other stars onto the envelope front and called it a day.

So there you have it.  If you have any feedback or requests don't be afraid to comment!
Till next time.
Rorystar.

Thursday 17 October 2013

Next week I promise!

Hello!

 I know I said a while ago that I would be back posting cards again yesterday but I can't get at my desk as it is a complete mess!  However, I'm all done with my dissertation now so I actually have the time to make cards again.  I will be posting next with a Christmas card as Christmas isn't as far away as I'm pretending it is.  So stay tuned, I'm working on it!

Rorystar

Thursday 19 September 2013

A break from blogging

Hello!

I'm sorry to announce that there will be no card this week, or next week, or the week after that.  I'm taking a short break from updating the blog as I have a dissertation to finish.  Once that is all done and dusted I will be back with bells on, updating on Wednesday's and if I get myself organised enough I may do a second update every week with Christmas cards.  Posts will start again on the 16th of October, so come back and check the blog then.  In the meantime, feel free to follow me on pinterest where I find a large amount of my inspiration. http://www.pinterest.com/rorystar/boards/

Till next time
Rorystar

Wednesday 11 September 2013

Flower Pot

Hello!

Today's card is one I made with my mother for my grandmother.  It took us over an hour to do, but I suspect that was mostly due to two people making decisions rather than one.
What you need:

  • several pieces of pink and purple papers
  • a piece of pale brown and a piece of green paper
  • embossing powder (gold)
  • vellum
  • embossing folder
  • flower dies and a flower punch
  • different coloured brads or gemstones
Making the card:
  • Using the embossing folder, emboss a pattern onto the brown paper.  Cut out a flower pot shape and set aside.
  • Using the flower dies and punch, create a selection of flowers from the pink and purple papers.  Taking two or three of the flowers, adhere them together using the brads.  Cut out some leaves from the green paper and set it all aside.
  • Emboss a 'happy birthday' sentiment onto the vellum with gold embossing powder.
  • Assembly: adhere the pot directly to the surface of the card, adhere the two largest flowers with foam tape and the smallest in the front on double foam tape.  Stick the leaves on around the flowers and the vellum banner across the bottom of the pot.
There you go! 
Till next time
Rorystar

Wednesday 4 September 2013

Falling Roses Card

Hello!

Today I feature a card that I have made for my Grandmother.  At the time I was making this card I had just received my first ever selection of embossing powders, so I went a little embossing happy.......
A while back I watched a youtube video by Kristina Werner where she used embossing powder on vellum and then coloured it with felt pens to create a stained glass effect.  Ever since seeing this video I desperately wanted to try it for myself, so when I got the embossing powder it was the first thing I did with it.  There are some differences between our cards, namely I used gold embossing powder and she used white, I also used different stamps and a different coloured card base, but essentially they are much the same which is why I am providing a link to her video and saying that I did NOT come up with this card design.
Here is a link to her video:
http://www.youtube.com/watch?v=jdsnWOT61h8
And here is my card:
You can't really tell from the picture, but there is a white ribbon above the happy birthday.

So yea, this is really an example of how you can take someones card design and recreate it using what you have.  I don't have white embossing powder so I used gold instead, I also don't have copic markers so I just used some felt pens, I don't have any kraft coloured paper either so I put it on a white base.  I still have much the same effect going on even though it isn't exactly the same.

Till next time,
Rorystar

Wednesday 28 August 2013

Happy bird-day!

Hello!

Today, you guessed it, is another birthday card!  This time for my friend who's favourite colour is orange.  So here is the card:

To make this card, you will need:

  1. A piece of orange patterned paper and white card
  2. A piece of black polka-dot ribbon
  3. Orange, brown, blue and yellow ink pads
  4. The 'happy bird-day' stamp (I found it at the warehouse, but I'm sure you could create something similar from several small stamps)
  5. A corner rounding punch
First cut the orange piece to the same width but half the height of the card base.  Adhere it on the bottom half and cover up the seam with the ribbon.
Cut a circle from the white card large enough to fit the stamp.
Very carefully ink up the stamp with the different colours, (the ink pads I used to do this were a triangular shape and it certainly helped) use a baby wipe to wipe off any colour that ends up where you don't want it.  If you fear that it has taken you too long to do this and you think the ink has dried a little then just huff on to it as if you were cleaning a pair of glasses and stamp.
Outline the circle with the black gel pen and then adhere it onto the card offset from the middle to the right.
Create a border along the edge of the blank space with the gel pen.

There you have it! I really enjoy this stamp so I couldn't bear to just stamp it in one colour hence the tricky inking.  Another way you could do this, is to mask off the section you don't want to colour with tape while inking, remove the tape then stamp, clean it off and mask off the area you just stamped, ink with a different colour and line it up to stamp.  If you don't happen to have this stamp or anything similar, you could get the same effect by using several small stamps, say two little birds, a small present and a sentiment stamp.  Using several stamps will make the process easier when it comes to inking them up because you can do them individually, but you may have issues lining it up so I suggest you practice it first.

Till next time,
Rorystar 

Wednesday 21 August 2013

The big 30!

Hello,

This week I am featuring a card for my partners 30 birthday.  He likes blue but he doesn't overly like the fact that he is turning 30, so I emphasized it (I am a little evil).
Here is the card:
That is one big 30!
To make the card, you will need:

  1. A piece of blue stripped patterned paper, a piece of white card and a piece of blue glitter paper
  2. A 'happy birthday' stamp
  3. Blue ink pad
  4. Either a die cutting machine with circle dies or scissors and a steady hand
First off, cut out your numbers.  I did this by hand (because I don't have and dies that are numbers) by drawing lightly on the card and cutting with scissors.
Using the numbers, determine how big the inner circle will be and cut it out of the blue glitter paper.  Then cut a circle that is a bit bigger from the white card.
Adhere the numbers to the glitter paper with dimensional foam, then the glitter circle to the white circle with regular adhesive.
Cut a piece from the stripy paper that reaches about 2/3 of the way up a standard card base and adhere it.  Adhere the circle over the edge of the stripped paper so that the edge of it runs a third of the way through the circle.
To make the banner, cut a strip from the white card about 2 cm thick, stamp the happy birthday in the middle and leave to dry for a few minutes.  Score either side of the sentiment and then again about 0.5cm along.  Fold the first score lines backwards (away from the sentiment) and the second score lines forwards.  Create the flag ends but cutting out a triangle. I did my scoring on a 10 degree angle, but it will work if you do it straight as well.
Adhere the banner to the card with dimensional foam behind the sentiment and regular adhesive behind the ends.

There you have it! one in-your-face 30th birthday card.
Till next time
Rorystar

Wednesday 14 August 2013

August, the month of birthdays. Happy Birthday Birds Card

Hello!

So as you see in the title, August is one of those months for me when many people I know are having their birthday.  While its good for them it does mean a flurry of card making and a flurry of present buying (I'm now rather broke).  So at the time of writing this blog post I actually have enough cards made to see me into September at my normal rate of one a week.
Anyway.....
Todays card is a birthday card for one of my oldest friends.  She loves birds and the colour green so I knew I had to incorporate them into the card.
Here it is:
To make this card you will need:

  1. a piece of green patterned paper, green glitter paper and a piece of white card
  2. a piece of black ribbon
  3. 4 different bird and a 'happy birthday' stamps
  4. a small butterfly punch
  5. a black gel pen
  6. blue and green ink pads
To begin, cut the green paper to the exact width of the card but 1cm shorter than the height of the card (and cut it straight unlike me).  Adhere this on the card front and then stick on the ribbon at the halfway point.  
Cut the white card to 2cm shorter than the width of the card and depending on the size of your bird stamps, about 4cm tall.  
Stamp the birds first in blue ink (I used a few different shades, but its not necessary) then stamp the 'happy birthday' in green above the birds. 
 Punch out a butterfly from the green glitter paper and adhere it on the 'y' of birthday. Create a border with the gel pen and a little trail for the butterfly.  
Adhere the white panel over top of the ribbon with dimensional foam tape.

And there you have it, one green and bird themed birthday card.

Till next time,
Rorystar

Wednesday 7 August 2013

Colourful Cupcakes

Hello!

Today I am featuring a card I made for my friends birthday a few weeks ago.  She is one of those people who loves all the not-so-good-for-you foods so I knew that I had to use cupcakes somehow.
Here is the card:
So as you can see, I went a little overboard with the cupcakes......
To make this card:

  • Cut a narrow panel of white cardstock.  Using a large cupcake image, stamp it just above the middle of the panel.  With the same coloured ink, stamp a happy birthday below.
  • Cut a piece of patterned paper to the size of a card front and adhere.
  • With similar coloured inks to the patterned paper, stamp two rows of small cupcakes along the top and bottom of the white panel.  Adhere the panel to the card with dimensional foam.
  • Add glitter to the cupcakes. (I used some cheap glitter glue pens in various colours)
And there you have it! A really fun card that is just so colourful.

Till next time
Rorystar

Wednesday 31 July 2013

Birthday Robot

Hello!

Today I feature a card suitable for a young boy.  I've always had trouble making cards for males but I knew when I found a robot stamp set that all my worries were over.  Combined with the 'heavy duty' embossing folder I have, the card turned out really well.
awwwww such a cute robot!
So to make this card you just have to stamp the robot, colour him in (I used colouring pencils), stamp a happy birthday and draw dash lines (I used a silver gel pen) around the border.  Then stick it on top of a grey card that has been embossed with the 'heavy duty' embossing folder and then smudged over the top with silver ink.
There you have it, a wonderful male card.

Till next time.
Rorystar

Wednesday 24 July 2013

Teddy Bear

Hello.

Today I am showing a card I made based off of this youtube video: http://www.youtube.com/watch?v=-i4m8ckYi6E .
Here is my version:
I have done it a bit differently.  Firstly I didn't use a panel, I just put the tape directly onto the card base.  I also used a stamp of the teddy bear as the focus point and put my sentiment below it on a separate piece of paper.  You don't have to use washi tape, strips of paper would also work as you can tear off the ends to get a similar look.

Till next time.
Rorystar

Thursday 18 July 2013

Three little birds

Hello!

So I forgot yesterday to post (my bad!), so here we are today with a card that uses patterned paper as the main focus.  Usually with my cards I use a stamp as my main focus but I had this paper and I knew I wanted to use it on a card but I didn't want the paper to just become the background like it normally does.
Here is the card:

How I made this card:

  1. Using a stencil (or just lightly drawing the shape in pencil) cut both of the bottom edges off the card base.
  2. Cut the patterned paper to fit the card front so that three sides are straight and the bottom edge is curved like the card base.  Adhere to the card base.
  3. Using a strip of white card stamp a sentiment in a coordinating colour and adhere with dimensional adhesive.
  4. Place sticky-backed gemstones on to the card using the blade of a craft knife (trust me it works) following a section of the pattern.
By using the patterned paper as the main focus it certainly reduces the amount of time it takes to make a card.  You do have to be aware of adding too much to the card front, and your efforts should be more focused on showing off the paper by adding small embellishments and changing the card shape.

That's all for today.
Rorystar

Wednesday 10 July 2013

Make a wish

Hello!

Today I am showing you a wonderful birthday card that is so pretty and of course, easy to do.


Nothing like a bit of glitter in the morning to cheer you up.
So to make this card you will need to:
  1. Have a white card base.
  2. Cut a panel of white card and a panel of gold glitter card that is slightly bigger than the white one. If you are like me and you don't like to waste glitter paper then cut the middle out and save for a future project. Don't cut too far though, you want to see only glitter around the white panel.
  3. On the white panel, emboss (or even stamp) an image that says make a wish.  I used an embossing folder, but there is nothing that says you can't stamp a similar image or even use a sticker or just write it on!  Then stamp along both vertical edges a star border in gold.  Again, if you don't have anything like it, you could draw them or stick on some of those little gold stars and draw little connecting lines between them.
  4. Adhere the glitter paper to the card with double sided tape.  Then carefully position the white panel over top also using double sided tape.  If you have cut out the middle of the glitter paper you should have little no to issue with the white panel adhering.  If you haven't, you may find the panel doesn't want to stick because glitter is a vain thing and always wants to be the center of attention.
  5. My final step was to carefully graze my ink pad over top of the embossed image to give it more definition and then I stuck a star over the 'i' because why not!
There you go, a simple wee card that doesn't take very long at all to make.  I made 4 of these in around an hour.  I used different coloured glitter paper and changed the colour of the ink for the stamps to match.

Here are the other cards:


Hope you enjoyed this post, till next time.
Rorystar.

Thursday 4 July 2013

Blue Butterfly

Hello!

Little late this week, was too busy yesterday to upload, but I'm here today!
This week I'm am showing off my blue butterfly card.  It is yet again a fairly simple card.
Isn't it pretty!
To make this card you need a large outline stamp of a butterfly, colouring pencils and a wee bit of time.
Stamp the butterfly image in black ink onto a piece of white card, towards the top.  Colour in with pencils (take your time, don't hurry) and adhere some gems to add sparkle.  Underneath the butterfly stamp a happy birthday in a blue (or you could really use whatever colour you feel like really) and then tie a piece of silver ribbon below.  Adhere the panel with dimensional adhesive to your card base and you are all done!
See easy, although a little time consuming if you are like me and take forever to colour things in.

Till next time.
Rorystar.

Wednesday 26 June 2013

Colourful Trio

Hello,

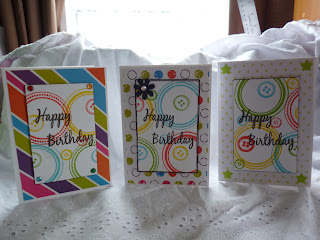
Today you get three for the price of one! I made these cards as a set due to my acquisition of a brand new stamp set.  I went a little bit crazy and ended up with a large panel of brightly coloured circles.  I sat there for a while attempting to figure out what I was going to do with the panel and chose to make three almost matching cards.
To make these cards you need to grab yourself a longish strip of white card and stamp lots of brightly coloured circles on it.  Then you cut it into three equal strips and stamp a 'happy birthday' in black in the middle of each panel.  Pick three different colourful patterned papers and adhere each of them to their own card base.  Outline each panel with a black marker and using dimensional adhesive adhere to the card bases.  Add extra embellishments such as coloured gems, glitter flowers and punched stars.


There you have it! I find creating cards this way to be really quick and great when you realise that there is several birthdays coming up.

Till next time.
Rorystar

Saturday 22 June 2013

Blue Birthday Circles

Hello,

Here is my next card, Blue Birthday Circles!  Again I made this card because of pinterest inspiration (its a great time waster website if you haven't heard of it).  It is also another simple card that doesn't really require much effort.
Yea I know, wonky photo......
Anywho, this is how I made it:

  1. Grab a piece of white card and create your base.
  2. Cut a piece of blue patterned paper slightly smaller than the card front and adhere to card base.
  3. Gather three different patterned papers that co-ordinate well together and cut one medium sized circle from each (either by hand or die cutting machine).  Cut one smaller circle from white card.
  4. Using a blue ink pad, stamp a happy birthday greeting (preferably a circular shaped one like I used, but it doesn't have to be) onto the smaller white circle.  Adhere to one of the bigger circles with dimensional foam.
  5. Adhere all three circles to the card base beginning at the top right and slightly overlapping the previous circle.
  6. Place three pearl gems to the bottom left corner to complete the card.
See, didn't I say it was easy?

Till next time.
Rorystar

Wednesday 19 June 2013

A Hearty Happy Birthday

Here is my first card!

I made this a while back due to a spark of inspiration from pinterest.
It is a fairly simple card, a good way to use up some of those scraps of paper.  This is how I made it:

  1. Using a heart shaped die (or trace a heart and cut it out with scissors) cut out a large heart from the top portion of a piece of white card.
  2. Using black ink, stamp a happy birthday greeting below the heart.  Also with the black ink, stamp a pretty border pattern across the bottom of the card.
  3. Glue on two pink heart shaped gems either side of the happy birthday greeting.
  4. Using a pink ink pad, gently wipe it along the inside of the heart to define the edge.
  5. To make the flower: Using a flower shaped punch, punch out 4 - 6 flowers from a sheet of pink paper.  Make a small cut in the center of each flower with a craft knife and gently push it onto a brad, once all the flowers are on the brad, open up the prongs to secure them in place.  Glue onto card at the bottom of the heart.
  6. Grab a piece of computer paper that is smaller in size than the white card and trace an outline of  the same heart on to it.  Using strips of various pink patterned papers cut to 1cm wide, glue them across the traced heart at a diagonal.  Trim off any excess.
  7. Using a piece of pink card, create the card base.  Adhere the computer paper with the strips of pink onto the base, making sure to align it so only the strips of pink paper will show through the heart.  Using dimensional foam, adhere the white piece over top.
  8. Step away from the table, dust yourself off and give yourself a pat on the back for a job well done!
So there you have it! Not at all hard.  It is one of those cards that can be easily changed to suit the recipient, say blue stripes under a star shape, or yellow under a circle.  The possibilities are unlimited!

Till next time
Rorystar.

An introduction

Hello,

I am Rorystar and in my spare time I like to make cards.  I have created this blog in order to share my creations, show my inspirations, and to hopefully inspire others in their card-making endeavors.  First of all, it should be noted that I am in no way a professional photographer, so sorry if the photos are a little 'funky'.  Second, it should be noted that I have a reasonable sized collection of crafty goodness and I really don't stick to any one brand in particular due mostly to my lack of funds and location (New Zealand).  Thirdly, I make cards because I like doing it, it brings me great satisfaction when I give them to the people I care about.  So, here is the very first post on what I hope will turn out to be a great way to unleash my creativity!

Rorystar